This homemade yogurt recipe is a true kitchen staple! It’s perfectly creamy, super delicious, and easy to make with this foolproof method.

Why You’ll Love This Homemade Yogurt
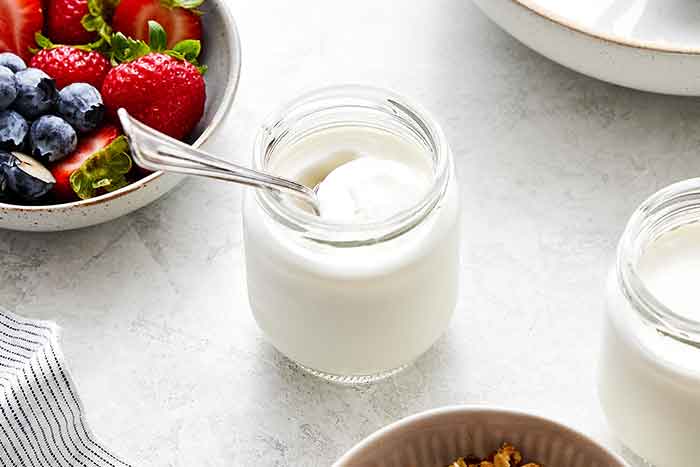
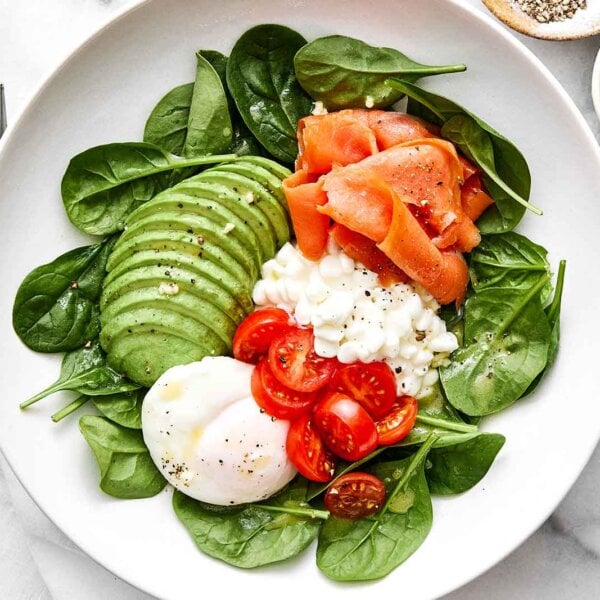
Making my own yogurt at home has been a total game-changer. I love a simple yogurt bowl with fresh berries. But it’s also a super delicious high-protein breakfast when combined with Turkish eggs or dolloped on my lemon ricotta protein pancakes. And while you can make yogurt using the stovetop and oven method, I strongly prefer using my Euro Cuisine yogurt maker. After making well over 100 batches of yogurt at home, I can confidently say I’ve never had a batch fail. Not one! When I first tried the stovetop method, I either boiled the milk over (huge mess) or scorched it to the bottom of the pot (which is not fun to clean). And I’d also prefer not to tie up my oven for eight hours while the yogurt incubates (as I frequently multi-task in the kitchen). So if you’re like me, here’s why you’ll love this approach too:
- Perfectly portioned. The yogurt maker portions the yogurt into individual serving jars, and the lids even have a date stamp, so you’ll always know when you made the batch.
- Great for meal prep. Homemade yogurt keeps well in the fridge for up to 10 days, which makes it perfect for easy breakfasts or snacks.
- Healthier than store-bought. There’s no preservatives, additives, or mystery ingredients. It’s just real, simple yogurt!
Homemade Yogurt Ingredients

It should go without saying that starting with the best quality ingredients ensures you’ll have the best quality end product. That means I always start with organic, grass-fed milk and use either a yogurt starter or a few tablespoons from one of my own previous batches.
- Milk: Whole milk will give you the creamiest yogurt, but you can use 2% milk, skim milk, or goat’s milk. The more fat in your milk, the thicker the end product will be. In the video below, I used 2% milk, which is why it wasn’t super thick. In my red fruit salad with honeyed yogurt recipe, I used whole milk, and you can see it’s much thicker.
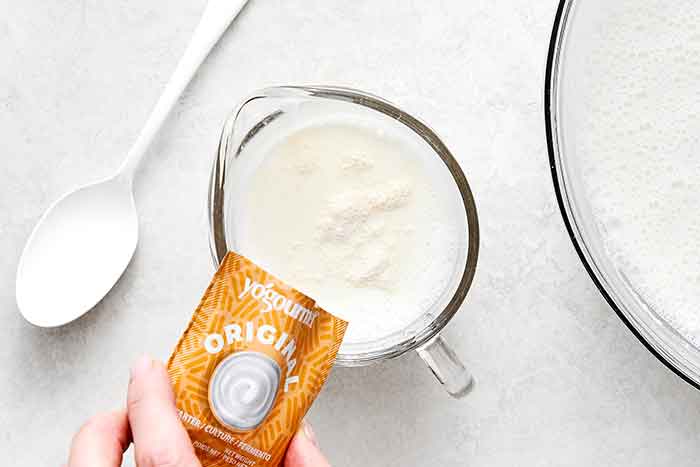
- Yogurt Starter: You can use a powdered yogurt starter (I use Yogourmet) or about 3 tablespoons of plain yogurt from a previous batch or a high-quality store-bought yogurt with live cultures. You can definitely use supermarket-brand yogurt as a starter, but please read the ingredients carefully and look for live, active cultures.
How to Make Homemade Yogurt

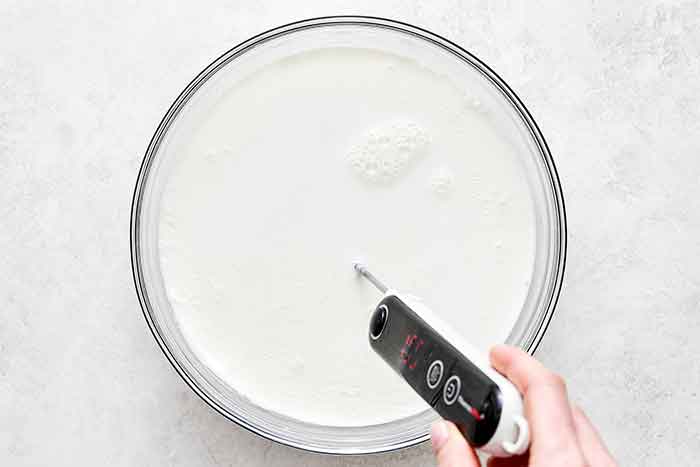
Step one: Heat the milk to 180°F. This step is important. Heating the milk kills any unwanted bacteria and creates the right environment for the good bacteria to thrive. It also helps create a thicker yogurt by changing the protein structure of the milk.
Step two: Cool the milk to 112 to 115°F. Once the milk is heated, let it cool down to this sweet spot. It’s warm enough for the good bacteria to grow, but not so hot that it kills them. An instant-read thermometer is your best friend here.

Step three: Add the yogurt starter. Pour about one cup of the warm milk into a bowl and whisk in your yogurt starter or 3 tablespoons of prepared yogurt. For a good starter, you’ll want cultures like Lactobacillus bulgaricus and Streptococcus thermophilus. Additional cultures like Lactobacillus acidophilus and Bifidobacterium lactis are a bonus.

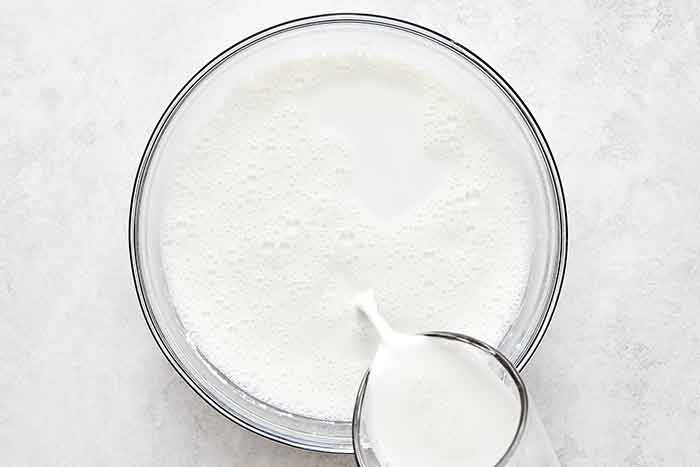
Step four: Combine everything. Pour the starter mixture back into the rest of the milk and stir well. This evenly distributes the good bacteria throughout the milk.

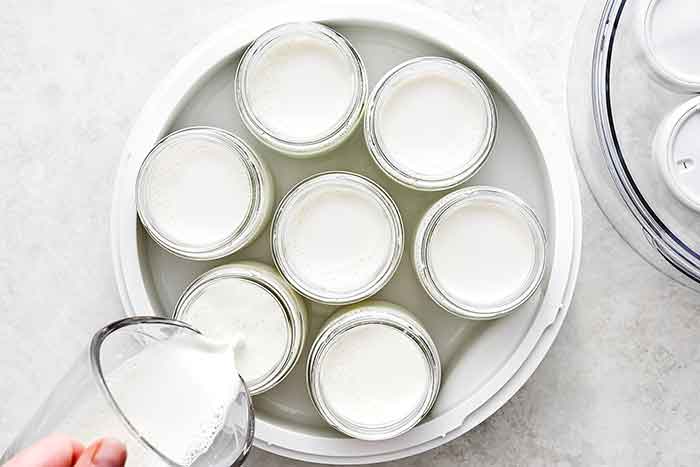
Step five: Incubate the yogurt. Pour the milk into the yogurt jars and place them in the yogurt maker. Let them incubate for 7 to 9 hours. The longer the yogurt incubates, the thicker and tangier it will become. Around 8 hours is usually my sweet spot for thick, creamy yogurt.
Step six: Chill and set. Transfer the jars to the refrigerator and let them chill for a couple of hours. The yogurt will continue to thicken as it cools, and then it’s ready to enjoy plain or with your favorite fruit and granola toppings!
Homemade Yogurt Tips
- The first time you make yogurt, it will likely taste a bit tangy, no matter how long you incubate it. That’s completely normal! Most of us are used to store-bought yogurts that are heavily sweetened, so your taste buds just need a little time to adjust. And trust me, they will (and pretty quickly).
- If you’d like to sweeten your yogurt, you can stir in 1 to 2 tablespoons of maple syrup during step #4 above. You can also add vanilla extract or the seeds from a scraped vanilla bean. Honestly, the vanilla alone makes the yogurt taste naturally sweeter without adding much at all.
- If you want to add fruit, wait until after the yogurt has finished incubating. Adding it earlier can interfere with the bacteria doing their thing, and we definitely don’t want to slow down the process of creating thick, creamy yogurt.
- Looking to make dairy-free yogurt? The process for coconut milk yogurt is very similar, with just a few nuanced differences. The good news? I’ve already got a recipe for coconut yogurt with blood oranges and cacao nibs (so good). Follow those instructions, and you’ll be all set!

Storage Tips
Homemade yogurt will keep well in the refrigerator for up to 10 days. Though I’ll be honest, once your family and friends find out you’re making yogurt from scratch, it probably won’t last that long!
More Delicious Recipes that Use Yogurt
- Strawberry Frozen Yogurt: Best homemade version.
- Red Fruit Salad with Honeyed Yogurt: Perfect for summer.
- Peach Breakfast Smoothie: A breakfast staple.
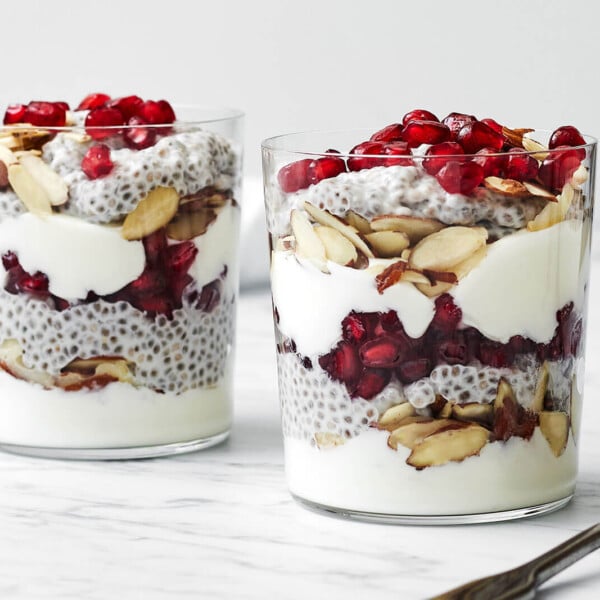
- Chia Pudding Parfait: You can customize the flavor.
- Smoked Salmon Frittata: The best brunch idea.
- Broccoli Salad: The yogurt-based dressing is so good!
If you try this homemade yogurt recipe, let me know how it turns out in the comments below! Your review will help other readers in the community. And if you’re hungry for more healthy food inspiration and exclusive content, join my free newsletter here.

Description
Video
Equipment
- Yogurt Maker My favorite one so far!
Ingredients
- 42 ounces organic milk, (whole, 2% or skim milk)
- 1 packet yogurt starter
Instructions
- Heat the milk. Pour the milk into a large glass, microwave-safe bowl. Heat the milk in the microwave on high for 10 minutes. Using an instant read thermometer, check the temperature of the milk. Keep heating in 1 to 2 minute increments until the temperature has reached 180°F (82°C).
- Cool the milk. Remove the milk and let it cool to 112 to 115°F (44 to 46°C). This process can be sped up by using an ice water bath.
- Add yogurt starter. Pour 1 cup of the milk into a small glass. Sprinkle the packet of yogurt starter on top and thoroughly mix it in.
- Combine together. Pour the small glass of milk back into the large bowl and stir to combine.
- Incubate the yogurt. Fill the glass jars of the yogurt maker. Set the timer for 7 to 9 hours. The longer you leave the yogurt, the firmer and more tangy it will become. More beneficial bacteria are also produced with a longer incubation time.
- Refrigerate yogurt. Once the incubation is complete, remove the glass jars and refrigerate. Before serving, you can add any toppings, such as fruit and granola.
Lisa’s Tips
- Storage tip: This will keep well in the refrigerator for up to 10 days.
- This Eurocuisine yogurt maker is my favorite brand!
Nutrition
©Downshiftology. Content and photographs are copyright protected. Sharing of this recipe is both encouraged and appreciated. Copying and/or pasting full recipes to any social media is strictly prohibited.
This recipe was originally posted May 2017, but updated to include new photos and information for your benefit!


Bonjour
I am French and discovered your site recently. I just love it and tried lots of your recipes.
Today reading about yogourt, I had been doing perfect ones with plain cow milk but tried last week with goat milk . They came out very liquid . Yesterday going to a farmers market I bought ewe milk and the lady gave me a recipe which seems a bit difficult to follow. I am trying today and hope they get thicker than the goat ones. Will tell you the result.
Did you ever tried those two milks and if so do you have tips?
Hi Martine – unfortunately, I haven’t tried those milks. But I’d be interested to hear how it turns out!
Hi Lisa
I was very successful with my ewe milk yogurts😀
The milk and the first yogurt came directly from the farm so I don’t know if it’s different with supermarket milk.
Here is the recipe from the lady.
Heat the whole ewe milk to 90° In a saucepan in water bath . That avoids burning the saucepan but it takes a bit longer.
Then wait until it gets down to 42°.
Add the yogurt and let mature for 30 minutes at 42°.
I found it easier to put it in the oven but since it starts at 50° I turned it a bit to the left
After 30 minutes I checked the temperature with my thermometer and it was under 40°
Then put the pots in your yogurt maker for 6 hours.
Anyway the yogurts were perfect and they taste so good ! So different from the cow milk ones.
It’s a bit less easy than the cow milk process but worth it.
Maybe I will try with goat milk again but I will ask which ingredient you must add to avoid the liquidity. The farm lady raises goats as well !
Hope you have a farmers market not too far from where you live and be able to try this recipe.😉
Thanks for sharing Martine! I do have one somewhat close by and will definitely check it out :)
Where do you buy the packet of yogurt starter?
Hi Lisa – you can buy it online or at your local supermarket.
Great video. Thank you
Wow this is helpful, thanks so much. I will share with my friends, and some single mothers out there.
Hi Lisa, I’m lactose intolerant and have great difficulty to buy plain yogurt here in England. Do you have any experiences at all with lactosefree milk? Will making my own yogurt work the same way?
Thank you!
Hi Erika – unfortunately, I’ve never tried making yogurt from lactose free milk, so I’m not sure how it would turn out.
If you culture your yogurt for 24 hours it removes most or all of the lactose
Hi Lisa, hope you’re doing well. I’m just wondering, can i use probiotics capsules which i bought from the chemist as my yogurt starter?
Hi Kristy – you can, if it has the right bacteria. It needs to include at least one of these for a dairy-based yogurt: Lactobacillus bulgaricus, Streptococcus thermophilus, Bifidobacterium lactis or Lactobacillus acidophilus.
And if the milk fermented naturally can i still add the flavors like strawberry or banana yoghourt
Hi Verenice – yes, you can add any flavors you’d like after it’s fermented. Enjoy!
Good morning. I will like to venture into a business of yoghurt making. Any school where i can practically learn this . Tha k you.
Please tell us how to strain yogurt to the thickness of Greek yogurt. Can I put it n the fridge while straining it? Thank you…..🙂🙂
Hi Sandy – you can use cheesecloth or a nut milk bag to strain the whey from the yogurt and make it thicker, like Greek yogurt. And yes, you can place it in the fridge while straining.
Can a yorghut starter be this normal vanilla yorghut we buy in the supermarket and I didn’t boil the milk . Will it work? Am scared .
Can I use powdered milk?
No, you need liquid milk for this recipe.
I was going to use “non pastured yogart” as that was what the yogart maker I have recommended instead of “yogart starter”.
My question is.. How much of the yogart do I use. I have 5 a 6 oz. Cups with my yogart maker.
I can break down the measurement from 42oz to 30 oz. But need to know the amount of yogart for 42 is or 30 oz.
Maybe I can use the oven for the 12oz that is left.
Thank you!
Hi Sandi – I’d recommend referencing the instructions that came with your specific yogurt maker.
Can I use a probiotic instead of the yogurt starter? thanks
Yes, that should work as well.
Will this make Greek yogurt or will I need to strain for Greek? Thanks
Hi Janet – you’ll need to strain it for Greek style yogurt.
Is the homemade yogurt supposed to be tart? I made my first batch and was surprised how tart it was! Just wondering if I did something wrong…
All yogurt is tart, it’s just that most people are used to supermarket yogurt that’s loaded with sugar. ;) You didn’t do anything wrong, but you can also sweeten it up a bit as well. I love a little drizzle of honey or maple syrup.
After eating it the second day, I realized I like it just fine this way. No need to add any flavors! Thanks for your helpful comments. I am truly thankful for your input.
Easy to find on the web, enjoyable to listen to , And thankful for your willingness to put it out there!
Hi Sarah – Thanks so much! :)
Thank you for your recipe. It turned out perfect. I did exactly what you did and I can’t believe I can make yogurt! It is so easy! Thank you again!
Hi Kelly – Glad this method worked out for you! Now you can always make your own yogurt instead of buying it :)
Can I use almond milk?
Hi Helen – you can follow the instructions on my coconut milk yogurt recipe, and use almond milk in that one.
Can you use nuts milks with this recipe?
Hi Liz – not with this recipe, but check out my coconut milk yogurt recipe. You could swap a nut milk in that version. :)
The best yoghurt recipe ive read so far….
I’d love to make a large batch for brunch next Saturday,i’d like to know how to measure each ingredients for a large batch.
e.g -amount of milk and starter to use to make 100 bottles(500ml each).
thanks Lisa!
Hi Lizzy – for each additional batch you make, just double the ingredients :)
This article thing really helps me doing my public speaking and its useful, easy to understand for child. The prove is I am currently nine years old and I got an achievement about the public speaking. -THANKYOU-
Note: i think my macbook is error right now i cannot rate, only comment though.
But I will give it a five star if its not error.
Hi Aline – Thanks so much for following along to my blog! I’m so proud and happy that my posts and videos are helping you with your public speaking :)
I just discovered you and have been amassing a “to try list” from your site for the last few days. I haven’t tried anything yet. But I can say that after three months of messing with the millions of ways to make homemade yogurt, I arrived at the identical method, down to the brand of yogurt starter. So, I think I’m probably gonna love your recipes.
Hi Amy – Haha I’m so happy to hear that! Can’t wait for you to try my recipes :)
Mine is heavily separated? Like a half inch of liquid on top of the yogurt. Did I do something wrong?
Hi Kathryn – How did you make the yogurt? With a machine or another way? And did you alter any of the ingredients?
Hi! I bookmarked this article so I could come back to try things out. Now I’m ready and the post is empty! I’ve tried a few browsers, fresh link, etc–all to no avail. Is there a plan to re-post it? Some great info in there! Thank you so much!
Hi Tito – the post is still there, so it sounds like an issue on your end. :)
Can I ask why you suggest pouring milk into a small container, then adding yogurt (or starter), mixing, then putting back in? Why not just skip that step: add yogurt to the whole thing, and mix?
It’s just to make sure it’s fully dissolved. :)
Can you brend fresh yogurt fruit into the milk after it has been heating?
Also can you add nut into the milk together with the starter
I would not recommend adding any fruit or nuts until after the yogurt is completely set.
Please can you scoop the milk with starter to make it thick with a scooping machine. if yes
Then can you scoop it again when it is back from the incubator
Hi Amoako – I’m not sure I understand the question.
With the electricity cost of incubation, is it still cheaper verses buying organic yoghurt?
I think it depends on where you live and by your spelling of yogurt, I’m guessing you do not live in the U.S. Yogurt is cheaper than in the U.S. in a lot of countries, but then milk is usually cheaper as well in those same countries. Yogurt makers use very little energy as they maintain a low temperature of around 115F. You will have to factor in the initial cost of the yogurt maker itself if you do not have one. Some people make it in the oven or with an electric blanket, but those methods are a bit iffy when it comes to maintaining the right temperature. For me, making yogurt at home isn’t just a little bit cheaper, it’s a LOT cheaper. But price isn’t the only reason to make yogurt at home. You get to control the amount of sugar and leave out all the gums and binders. But again, I will say, that European countries have far superior yogurt than the U.S. I actually started making my own yogurt because after spending time in Europe, I couldn’t stand American yogurt anymore.
Hi, Would I be able to use honey instead of maple syrup? I like mine a little sweet, but not overpoweringly sweet.
Hi Suzanne – Yes, you can definitely use honey instead of maple syrup to sweeten the yogurt. :)
Have you ever tried making yogurt with almond milk? Thinking of making it more keto friendly.
Hi Diana – yes, make sure to check out my post linked above for coconut milk yogurt. You can follow that same process for almond milk yogurt. :)
Hi, I’m a kid doing a science fair project about yogurt. I used your site as a resource on how to make yogurt. But we didn’t use an incubator, but will that affect the result? we just left it where it was warm instead of the incubating part. So can I say it is okay to make this without an incubator?
Hi Taylor – If you kept it in a warm environment (like the oven with the light on) that is still incubating the yogurt. You’re just not using an electric incubator like a yogurt machine. So you can say that it’s possible to make yogurt without an electric incubator or machine. :)
My yogurt came out nice and thick the first day, The second day it turned back to liquid,
That’s strange. Did you keep it refrigerated? And did you change any of the recipe ingredients?
Love it Got the maker and made a batch. Im trying to recreate the bery smooth creamy yogurt I had in Scotland with stewed fruits it was absolutely delicious and not too tangy but very creamy. Any ideas on how to achieve this flavor.
Awesome! Congrats on your yogurt maker. Homemade yogurt is the best. :) And unfortunately I don’t know how to achieve that flavor, but I’m sure you could find something similar online. :)
Great post! I love so much how you talked about WHY each step is done. I’ve read other recipes for yogurt, and it can seem confusing. (First boil the milk, then cool it again.. Whaaa??)
Thanks for posting!
I’m happy you found the information in the post helpful Britney! I know many recipes can be confusing when it’s your first time making them. Hopefully you had wonderful homemade yogurt success! x
What is yoghurt starter ???i have not made it before but I want to give it a trial
Hi Vivian – a yogurt starter contains the bacteria needed to make yogurt. I link to the yogurt starter I use for this recipe in the post above. :)
Can I ask how long you can make homemade yogurt by using your previous batch of homemade yogurt as the starter? I can’t seem to find much information online. I’ve been doing it for about a month and it still tastes good. Will you get sick if you don’t start again with a yogurt starter or store bought yogurt?
As long as it continues to firm up, that usually means the bacteria is still good. If it no longer sets, I’d start again with a new starter.
Thanks for the recipr. I received anbc Oster greek yogurt naker for Christmas. I just made a batch but the instructions said 9 cups of milk and One starter pack. It did not set. I am guessing not enough starter? I read other recipes and instructions on the starter packagr. Says 1 liter to .5 gram starter OR 1 cup plain yogurt. I have a 1 liter batch going again so I will see tonight if this workds. Also you didn’t boil the milk then do cooldown? This recipe said bring to boil then cooldown.. Hope this works. Thanks!
This was great basic instructions ! And this made it sooo much easier than other makers did . Can a slow cooker be used to make this yogurt ? Thank you for building up confidence for a first time yogurt maker
I’m glad you enjoyed the recipe! I’m sure a slow cooker can be used, but unfortunately I haven’t tried that method yet.
I forgot to turn on my yogurt maker When I came back 6 hours later I was horrified with myself but though what the heck turn it on and try It was the creamiest smoothest least sour yogurt that I have ever made and I’ve been making yogurt for over 30 years
Oh yay! Gotta love when a mistake turns into a winner like that. Congrats!
Hi. Can I use a probiotic and the yogurt starter? Or do they have the same thing in it? How long will it last in the refrigerator after making? Thanks for the recipe. Will try.
If I want to save some yogurt from what I just made for the next batch how to I keep it do I still keep in the refrigerator with the other or keep it at room temperature
Yes, keep it in the fridge.
Hi Lisa,
Is there any way to make the yogurt from Cashew Milk? I try to do dairy free most of the time. Do you think this would work, have you ever played with that?
Diana
Yes! Read this recipe for coconut milk yogurt. It would be similar to this one as a dairy-free yogurt. :) https://rmavxiou.top/recipes/coconut-yogurt-with-blood-oranges-and-cacao-nibs/
Thank you for this recipe! Do you happen to know how to make skyr? I eat it every day, and I like that it’s high in protein, so I would love to learn how to make it!
Hi Anya – my understanding is skyr is thicker and strained, similar to greek yogurt. Unfortunately, I’ve never made it, but if you strained your homemade yogurt you’d definitely end up with a thicker version. :)
I have a question about the yogurt starter. I don’t think I can find this where I live so I was wondering if I got a commercially available organic plain yogurt if I could use that as a starter? I’ve never made yogurt and feeling tentative due to the starter and not growing the wrong bacteria!!
Thanks for any help you can lend!
Hi Ana – you could absolutely use commercial yogurt as a starter. Just look for a plain, organic one with with no added sugar (or very little sugar). And the more strains of bacteria the better! It should work out perfect. :)
Have you used the Instant Pot to make yogurt?
I haven’t yet. But it’s on my to-do list! :)
I made homemade yogurt the other night and it worked great! I actually used a half gallon of ultra-pasteurized organic milk (before reading that it might not work) and a small cup of Dannon starter. The ultra-pasteurized milk worked fine! Instead of putting my jars in a cooler, I put the oven on 170 (the lowest setting available on mine), then turned the oven off, turned the oven light on, and put the jars inside. In the morning: yogurt! It was really delicious…much sweeter and milder than storebought plain yogurt, which I don’t like at all. I’m eager to try flavoring it differently, too.
Wonderful – so happy to hear it turned out! Homemade is the best! And yes, try switching it up with flavorings. I’m definitely taking advantage of all the in-season strawberries right now! ;) x
I have always wanted to try making this at home! I just love this tutorial. Now, I need hubby to get me the machine, haha – Jessica
Thanks so much! And just remind your husband that he’ll benefit from it as well! ;) x
I’ve never made my own yogurt and now I want to try.
You should definitely try it. So much healthier when you can control the ingredients. :)
Love how easy it is to make homemade yogurt! I’ll have to check out the Euro Cuisine yogurt maker! Your yogurt looks so creamy and delicious! Perfect for breakfast or as an afternoon snack! Great tips you shared too!
Yes, the Euro Cuisine makes it super easy. And after you do it once, you’ll be a pro! :) x
This a great tutorial! Thanks for sharing!
Glad you liked it!
Back in India where I grew up, our mothers wouldn’t dream of buying yogurt from the store – it was always made at home with a starter that sometimes were handed down for generations! But since moving to the US, I haven’t had homemade yogurt, for want of a proper starter.I’ll have to try Yogourmet soon! Thank you!
How amazing that the starter was passed down for generations. I can only imagine all the unique and beneficial bacteria in it! Definitely give this recipe a try and there’s quite a few different starters to choose from – just depends on the bacteria you’re looking for. Enjoy!
Thank you for this thorough written and visual recipe tutorial, as always! Love nourishing, full-fat yogurt.
Thanks Liz! It’s so creamy and good. And after filming this video, I now have a double batch to enjoy for the next two weeks. Ha! ;) x
I’m putting in my request for seasonal yogurt parfait recipes! :) x