Are you ready to make the BEST Thanksgiving turkey recipe? Trust me, it’s easier than you think!
My foolproof turkey is juicy, golden, and packed with flavor—without the hassle of brining or basting. With just a few simple steps you’ll have a perfectly cooked turkey that’s tender on the inside, crispy on the outside, and sure to impress everyone at your Thanksgiving, Christmas, or holiday dinner table!

Why You’ll Love This Turkey Recipe
There’s something about cooking a turkey for Thanksgiving that intimidates a lot of people. I totally get it. I remember being intimidated the first time I roasted a turkey and worried about overcooking it or serving a dry bird to a table of family and friends. But here’s the good news: cooking a turkey is actually super easy! Just think of it as cooking a really large chicken (I’m being serious). It might take longer to cook, but the process is almost identical. And while some people get fancy with expensive equipment, gadgets, and smokers, you don’t need any of that to make a classic, ultra-flavorful, and juicy turkey. Here’s why you’ll love my recipe:
- Simple, step-by-step instructions. It’s perfect for first-time turkey roasters and I’ve got a video below that walks you through everything.
- No brining or basting required. I’m all about keeping things simple and stress-free.
- Incredible flavor. All you need are a few key aromatics and my herb butter mixture.
- Perfect results every time. The most important thing! This recipe delivers an absolutely beautiful, juicy, and golden turkey for your table.
Roast Turkey Ingredients
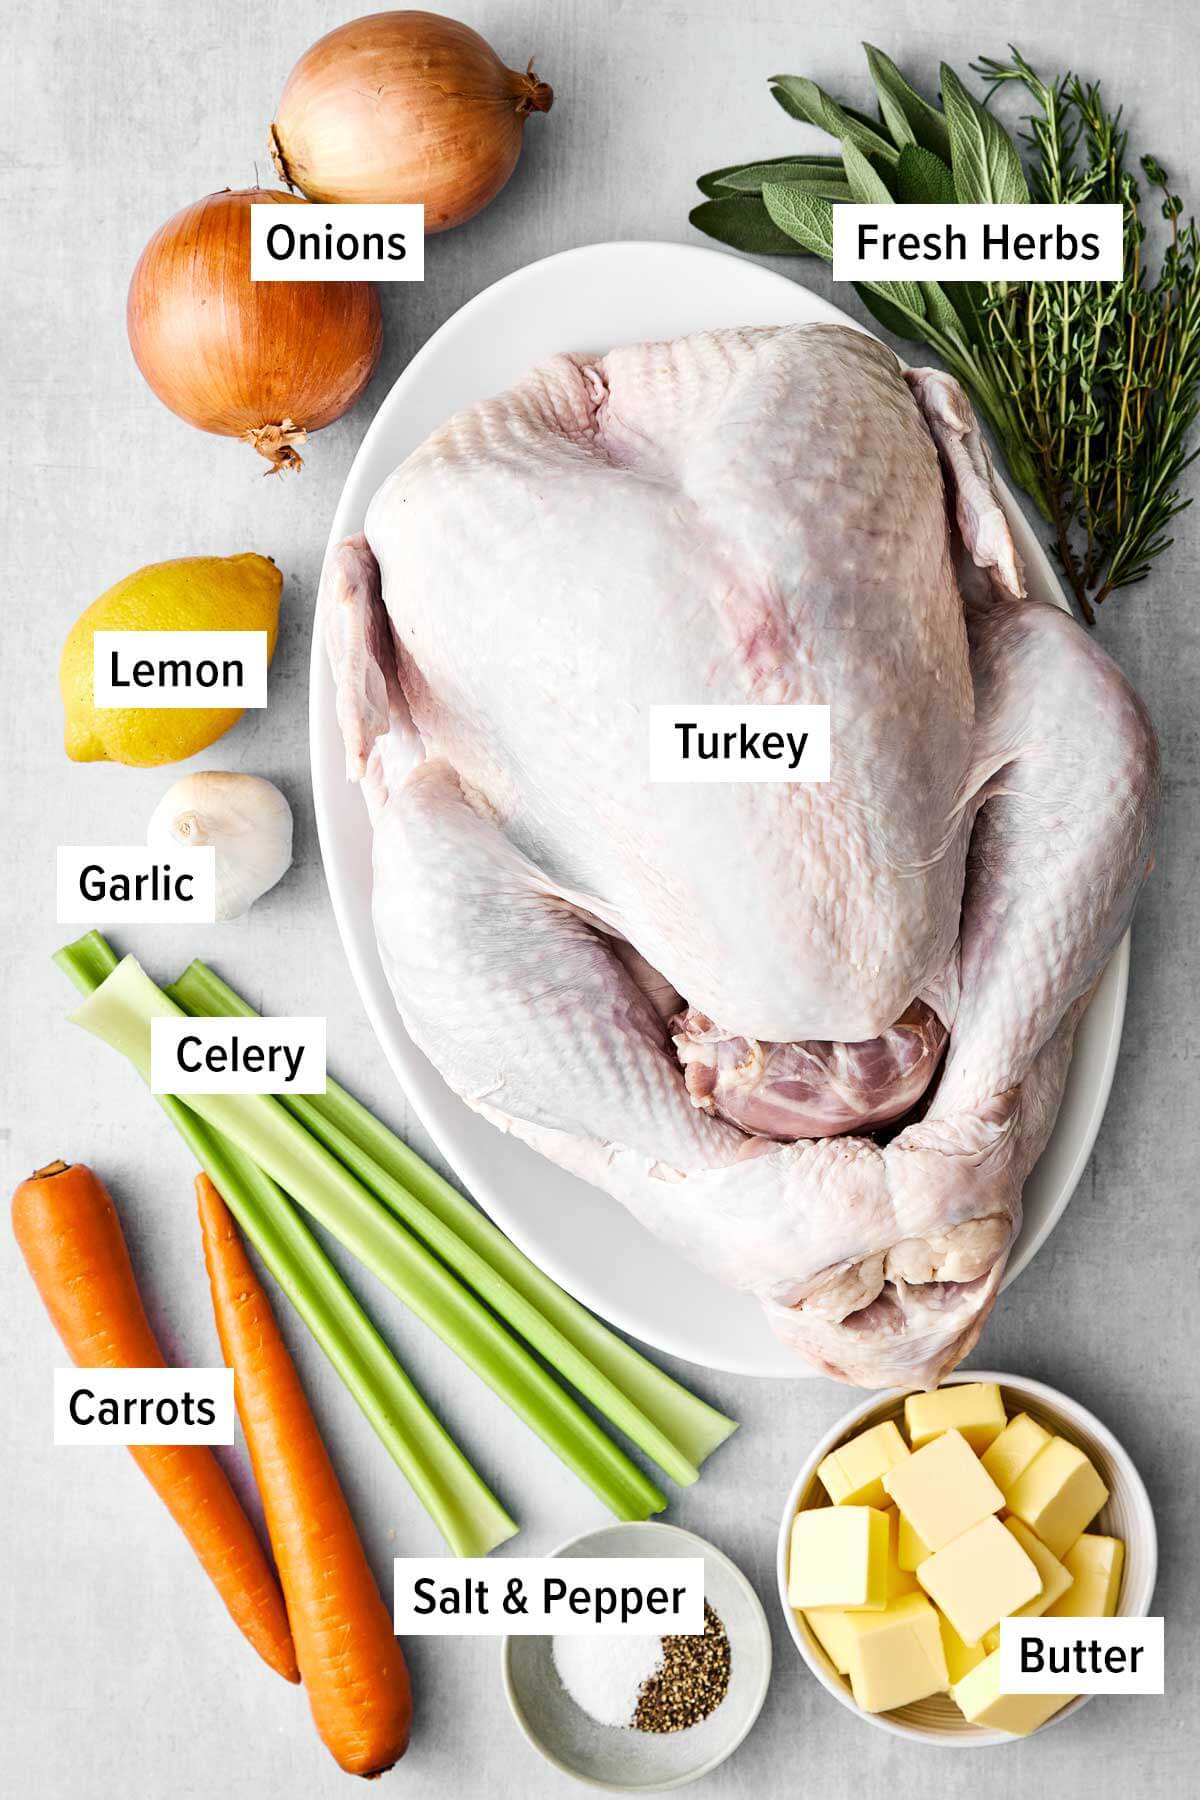
- Turkey: Any whole frozen (or fresh) turkey at the market works. For details on what size is best, read below.
- Fresh Herbs: Rosemary, thyme, and sage are classic poultry herbs. And while you can use dried, I do think fresh imparts a more robust flavor.
- Onion and Lemon: These go inside the turkey to help keep the meat moist and infuse it with fresh flavor.
- Garlic: An essential ingredient for that savory, garlicky skin that everyone desires.
- Butter: A generous amount of butter makes for a juicy turkey without the need to brine. Now there’s some time savings!
- Salt and Pepper: For that perfectly seasoned bird!
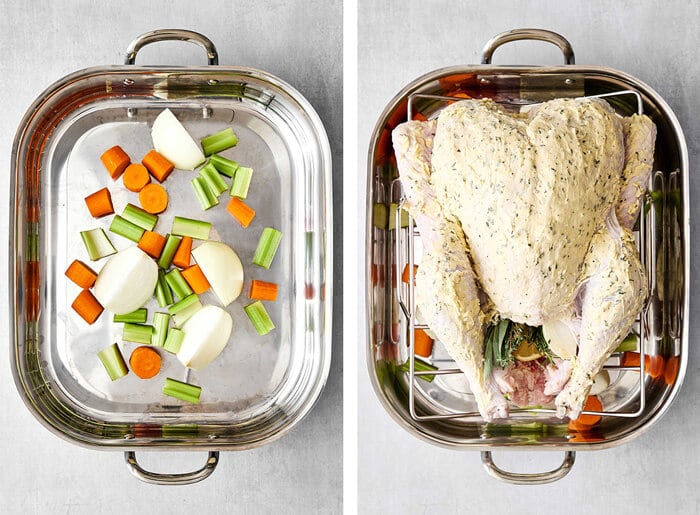
Pro tip: I also put vegetables under my turkey (like celery, carrots, and onion) while it’s roasting. This isn’t required, but I do recommend it. Not only will it amp up your turkey recipe, but it will take your turkey gravy flavor to the next level too!
Find the printable recipe with measurements below.
What Size Turkey to Buy?
The general rule of thumb is 1 pound of turkey per person. Or 1 ½ pounds of turkey per person if you want leftovers (and we always want leftovers, right?). It’s always best to have a little extra turkey than not enough, so I recommend:
- Less than 8 people: While it will be more turkey than you need, I recommend buying a 10 to 12 pound turkey. Anything smaller and you’re paying more for bones rather than meat. Remember, you can freeze turkey leftovers.
- For 8 people: Get a 10 to 12 pound turkey
- For 12 people: Get a 14 to 18 pound turkey
- for 16 people: Get an 18 to 24 pound turkey
- More than 16 people: It’s best to buy two turkeys rather than one monster sized turkey.
Don’t Forget to Thaw The Turkey
The biggest mistake people make is buying a frozen turkey the day before Thanksgiving. Don’t do that! Remember that a big turkey is going to take a while to defrost in the fridge. It takes about 24 hours per 5 pounds of turkey to properly thaw. My recommendation: follow my Thanksgiving timeline and buy your turkey at least a week before Thanksgiving. Then, let it thaw in the fridge 3 to 4 days before the big day.
No, You Don’t Need to Wash It
All you’ll do is contaminate your sink and kitchen and make a mess. We’ve talked about this before with chicken, and the same applies to turkey. Any bacteria on the turkey will get killed in the oven while baking.
Don’t Cook Stuffing In the Turkey
If you want perfectly cooked stuffing and perfectly cooked turkey, cook them separately. If you overfill the cavity of the turkey it slows down the cooking time. Plus, it’s better to fill the turkey with aromatics and herbs that give it incredible flavor and moisture. So cook your stuffing in a casserole dish instead.
Equipment You’ll Need
There are three basic kitchen items you’ll need to roast your turkey—a roasting tray, thermometer, and a sharp knife.
- Roasting Tray: You can buy an expensive roasting tray, a solid mid-priced roasting tray, or use a cheapie disposable roasting tray. They all work just fine.
- Thermometer: The same goes for thermometers. You can use a probe thermometer (that you leave in the turkey), an instant read thermometer (what I most often use), or a basic meat thermometer.
- Knife: Of course, a sharp knife is essential! I have this carving knife and fork set.
How to Cook A Turkey
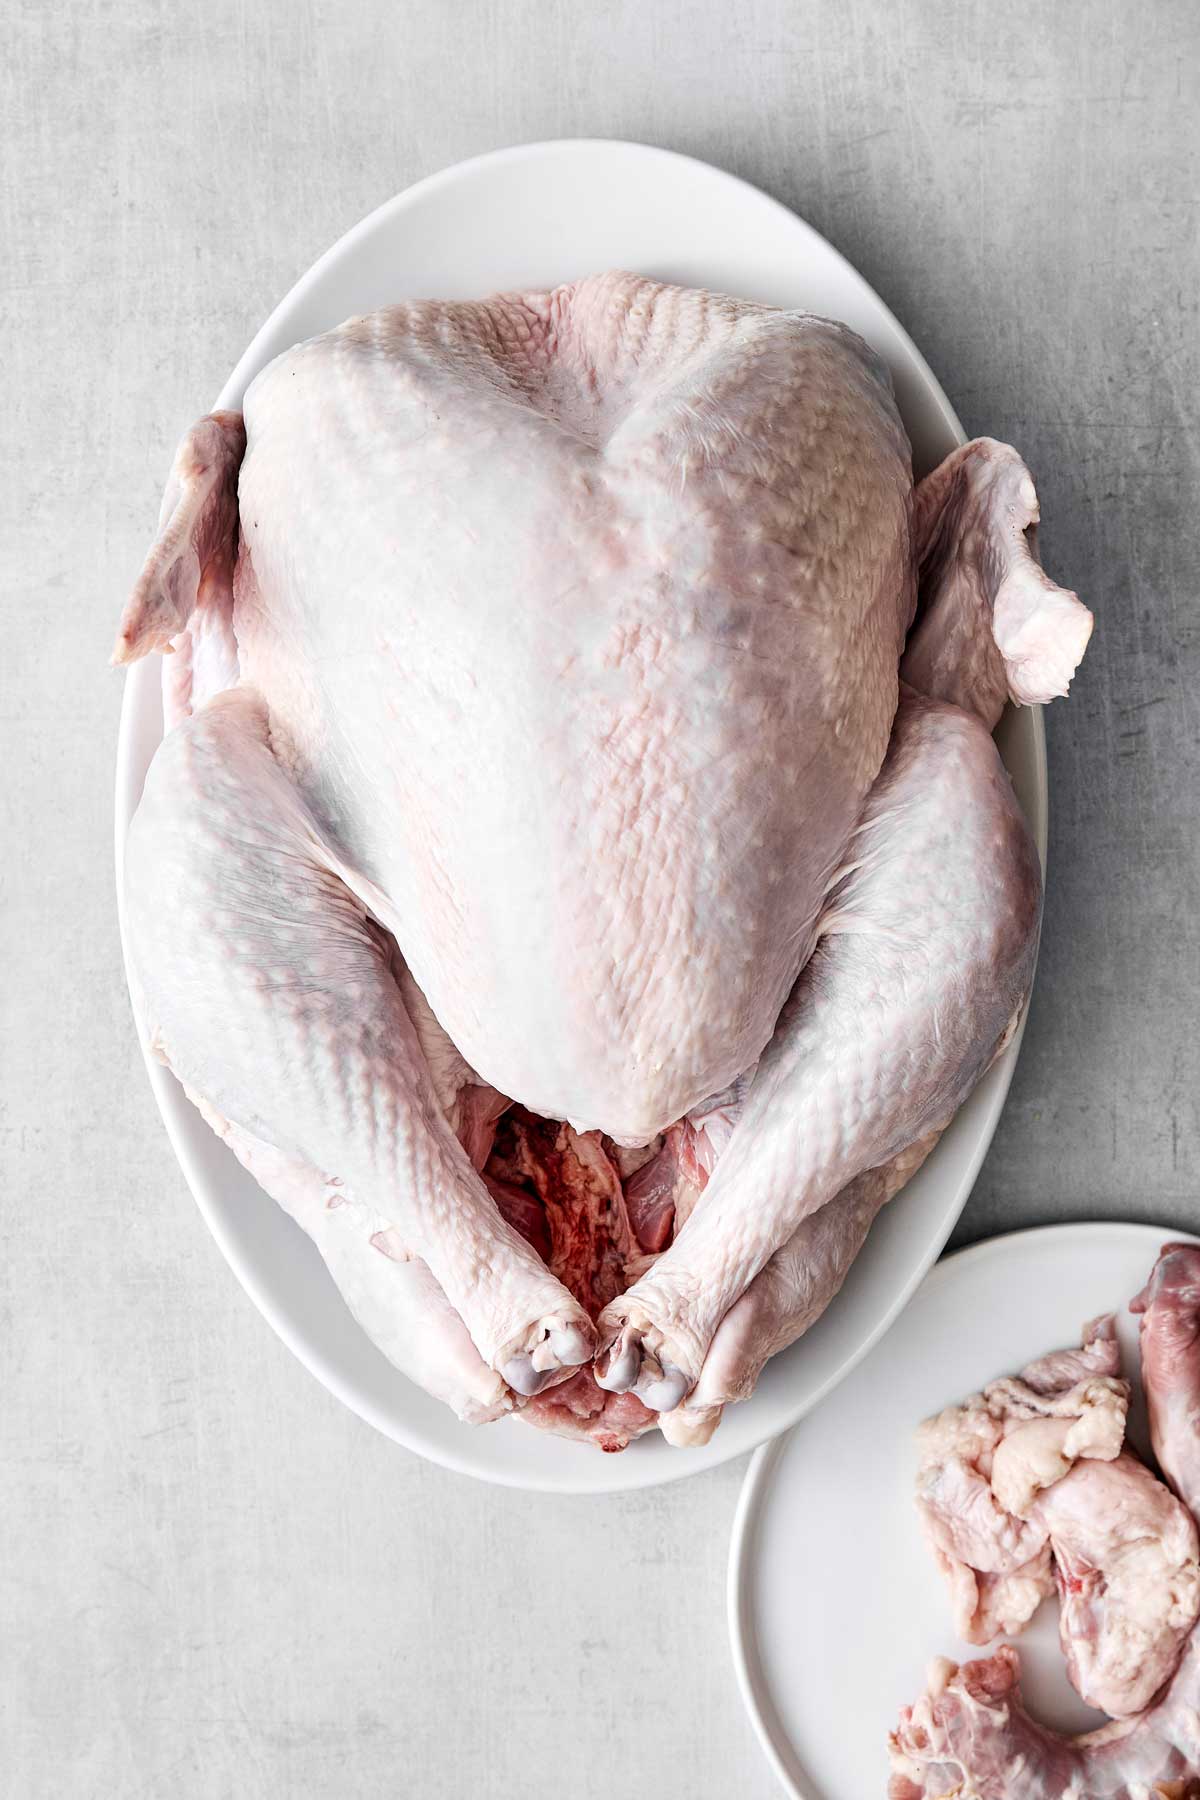
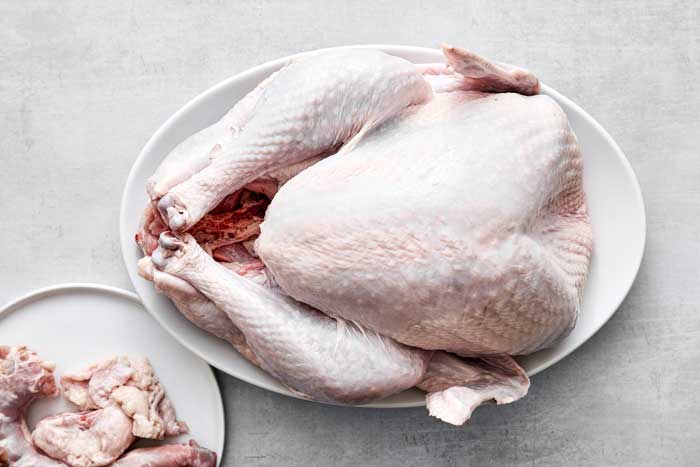
Step one: Thaw the turkey and remove the giblets. Once your turkey is thawed, let it rest at room temperature for an hour. Remove the bag of giblets and the neck, found in the large cavity and sometimes the smaller neck cavity (check both areas just to make sure you got everything out). You can save these items for gravy or discard them.
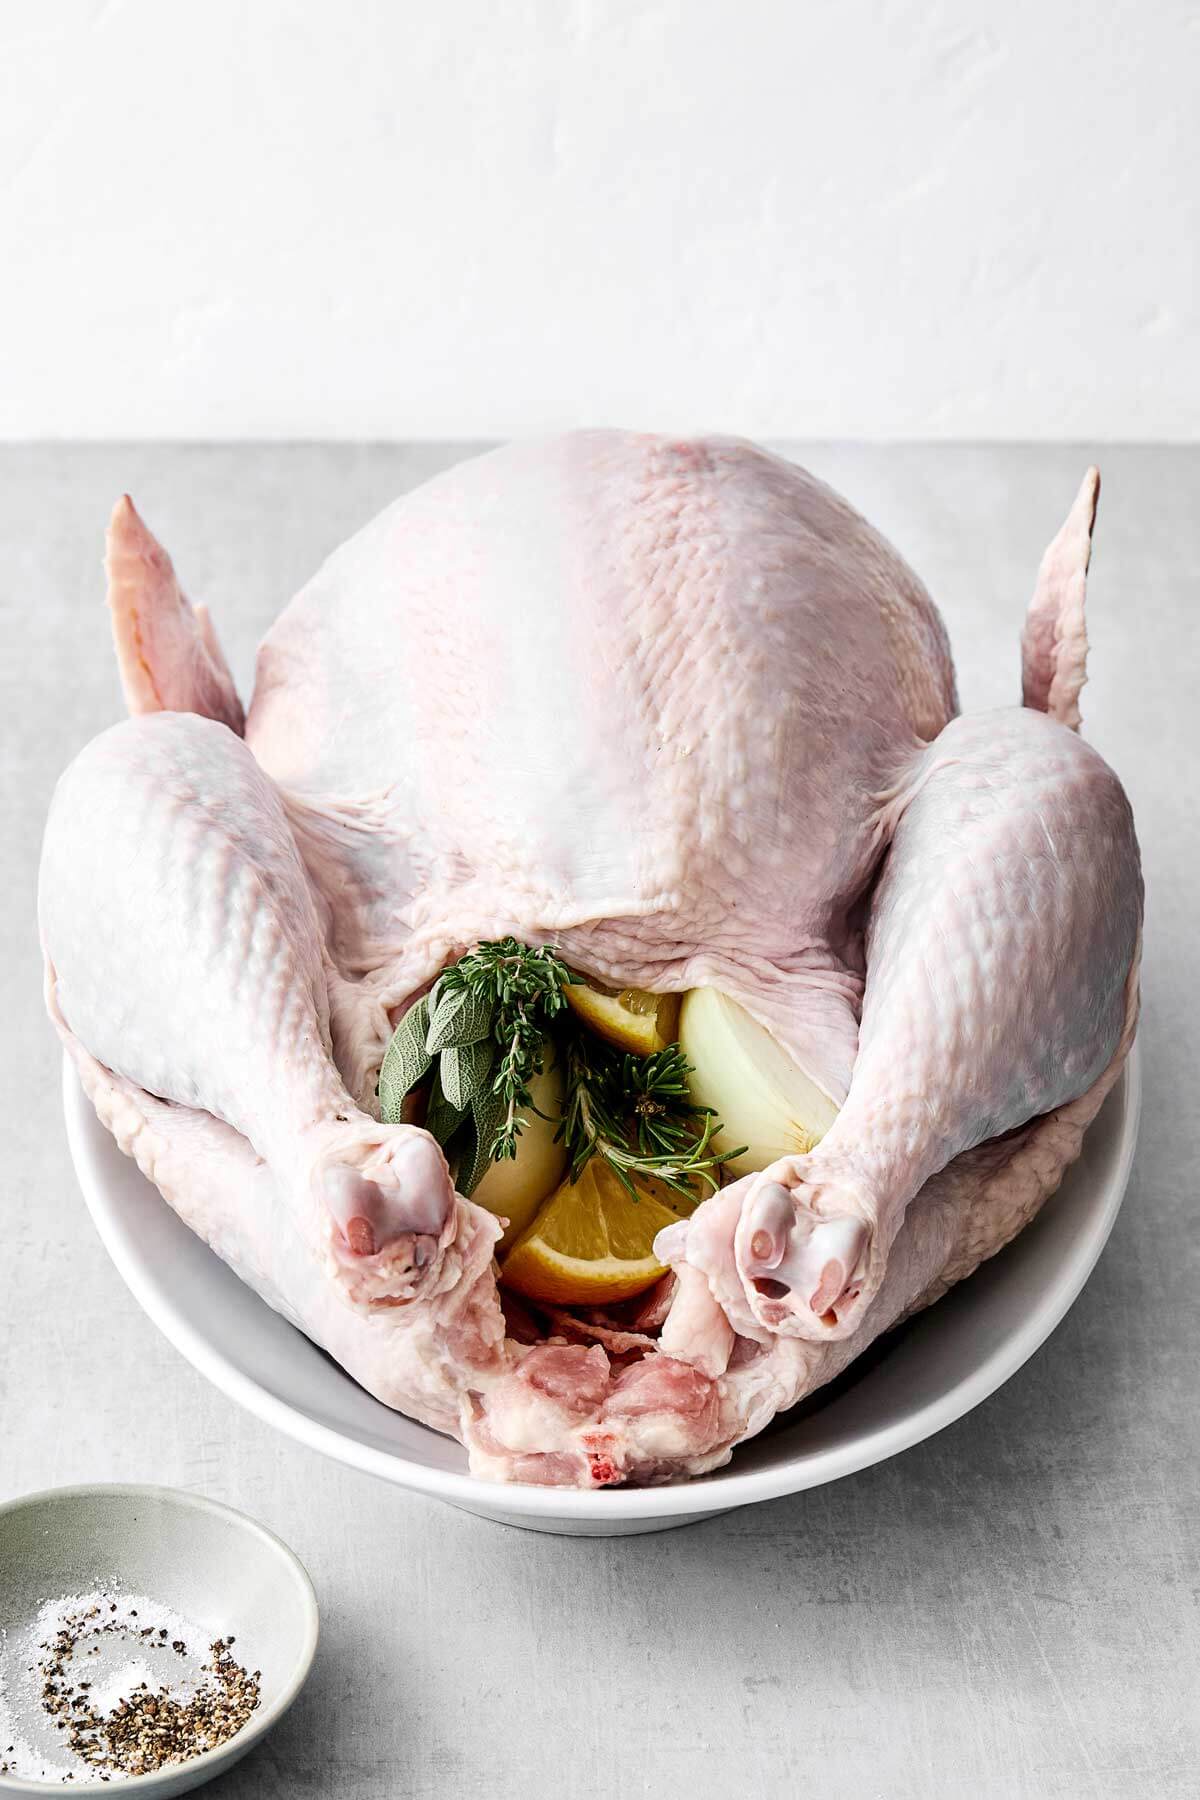
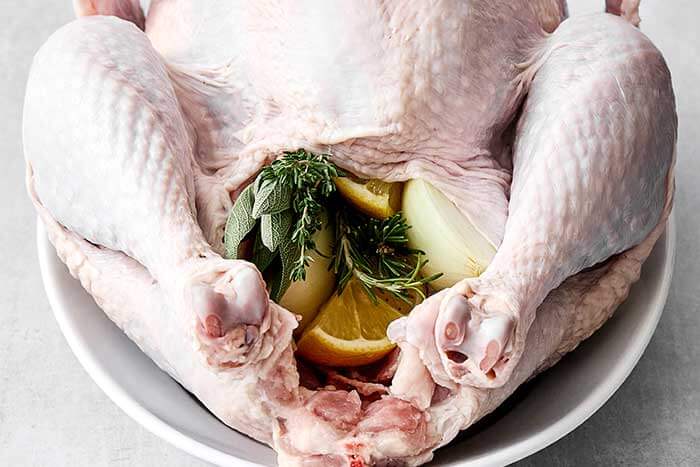
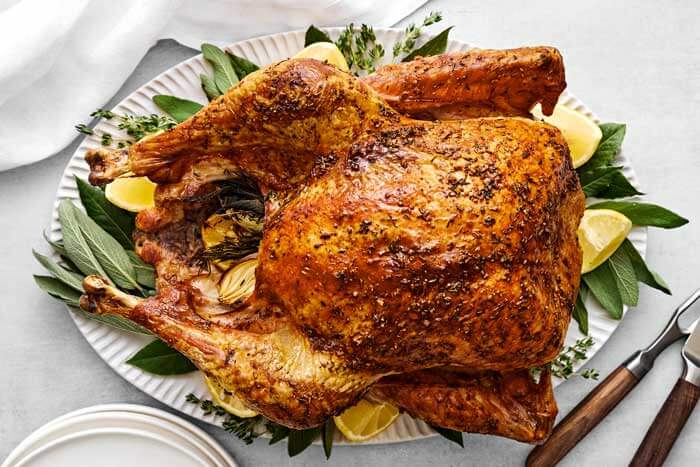
Step two: Pat it dry and fill the cavity. Pat the turkey dry with a paper towel (this is key to getting that extra crispy skin!). Then, season the inside of the turkey generously with salt and pepper, and stuff the cavity with quartered onion, lemon wedges, and fresh sprigs of herbs. If anything, go lighter on the sage than the other herbs, as it’s more potent.
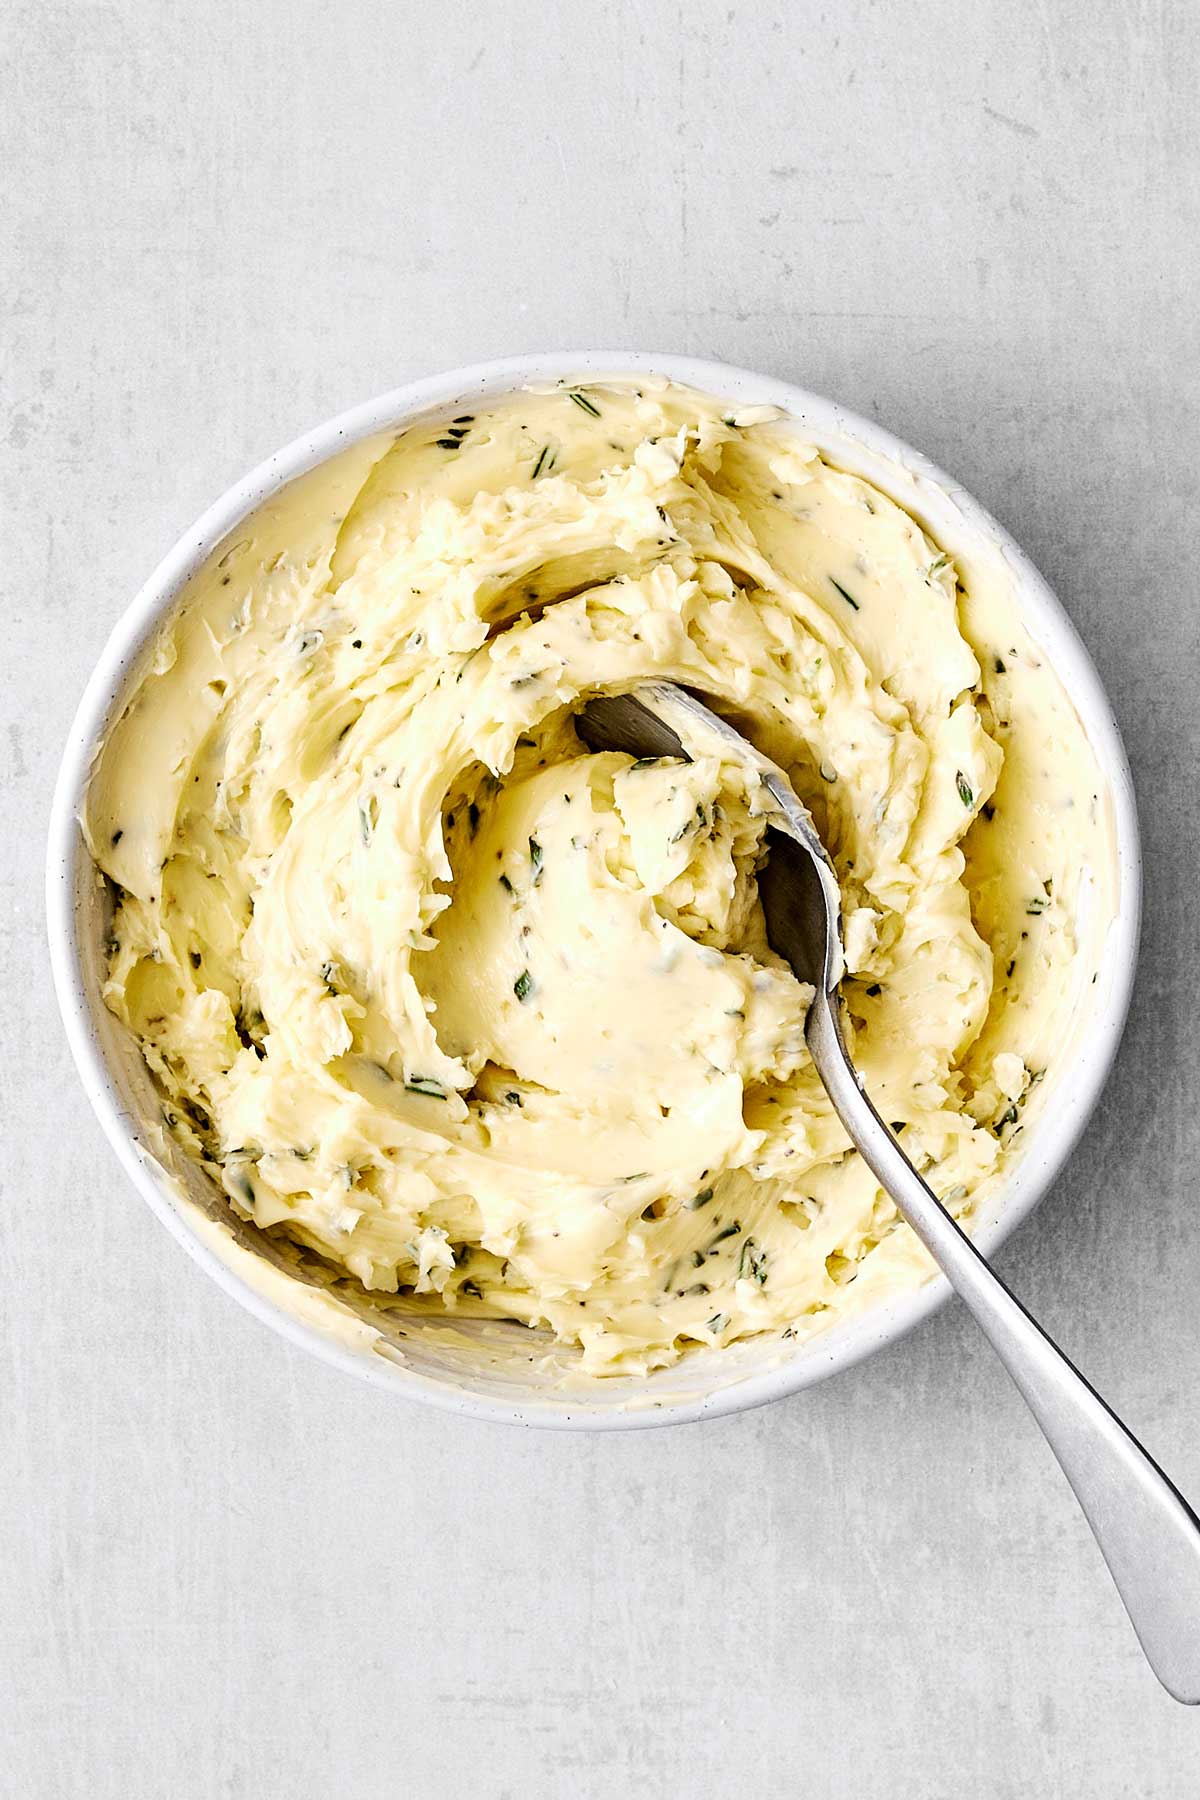
Step three: Make the herb butter mixture. Make the herb butter by stirring together the softened butter, garlic, salt, pepper, rosemary and thyme in a small bowl.
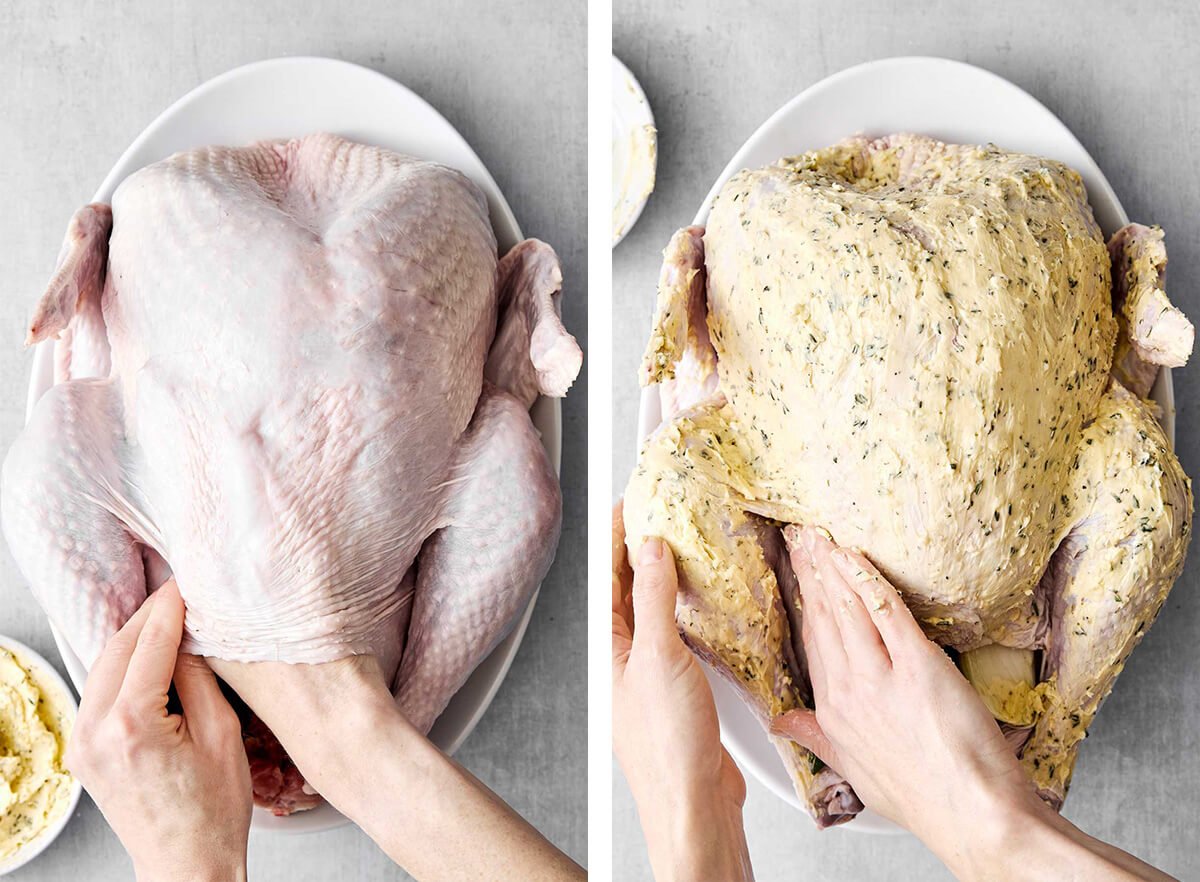
Step four: Spread the herb butter all over. Loosen the skin of the turkey on top of the breasts by gently sliding your fingers underneath. Spread about ⅓ of the compound butter evenly underneath the skin. Spread the remainder of the herb butter all around the outside of the turkey.
Pro tip: Don’t truss the legs! Resist the urge to tie the turkey legs together. Yes, it makes the turkey picture perfect, BUT trussing prevents the air from circulating properly, which can result in unevenly cooked meat.
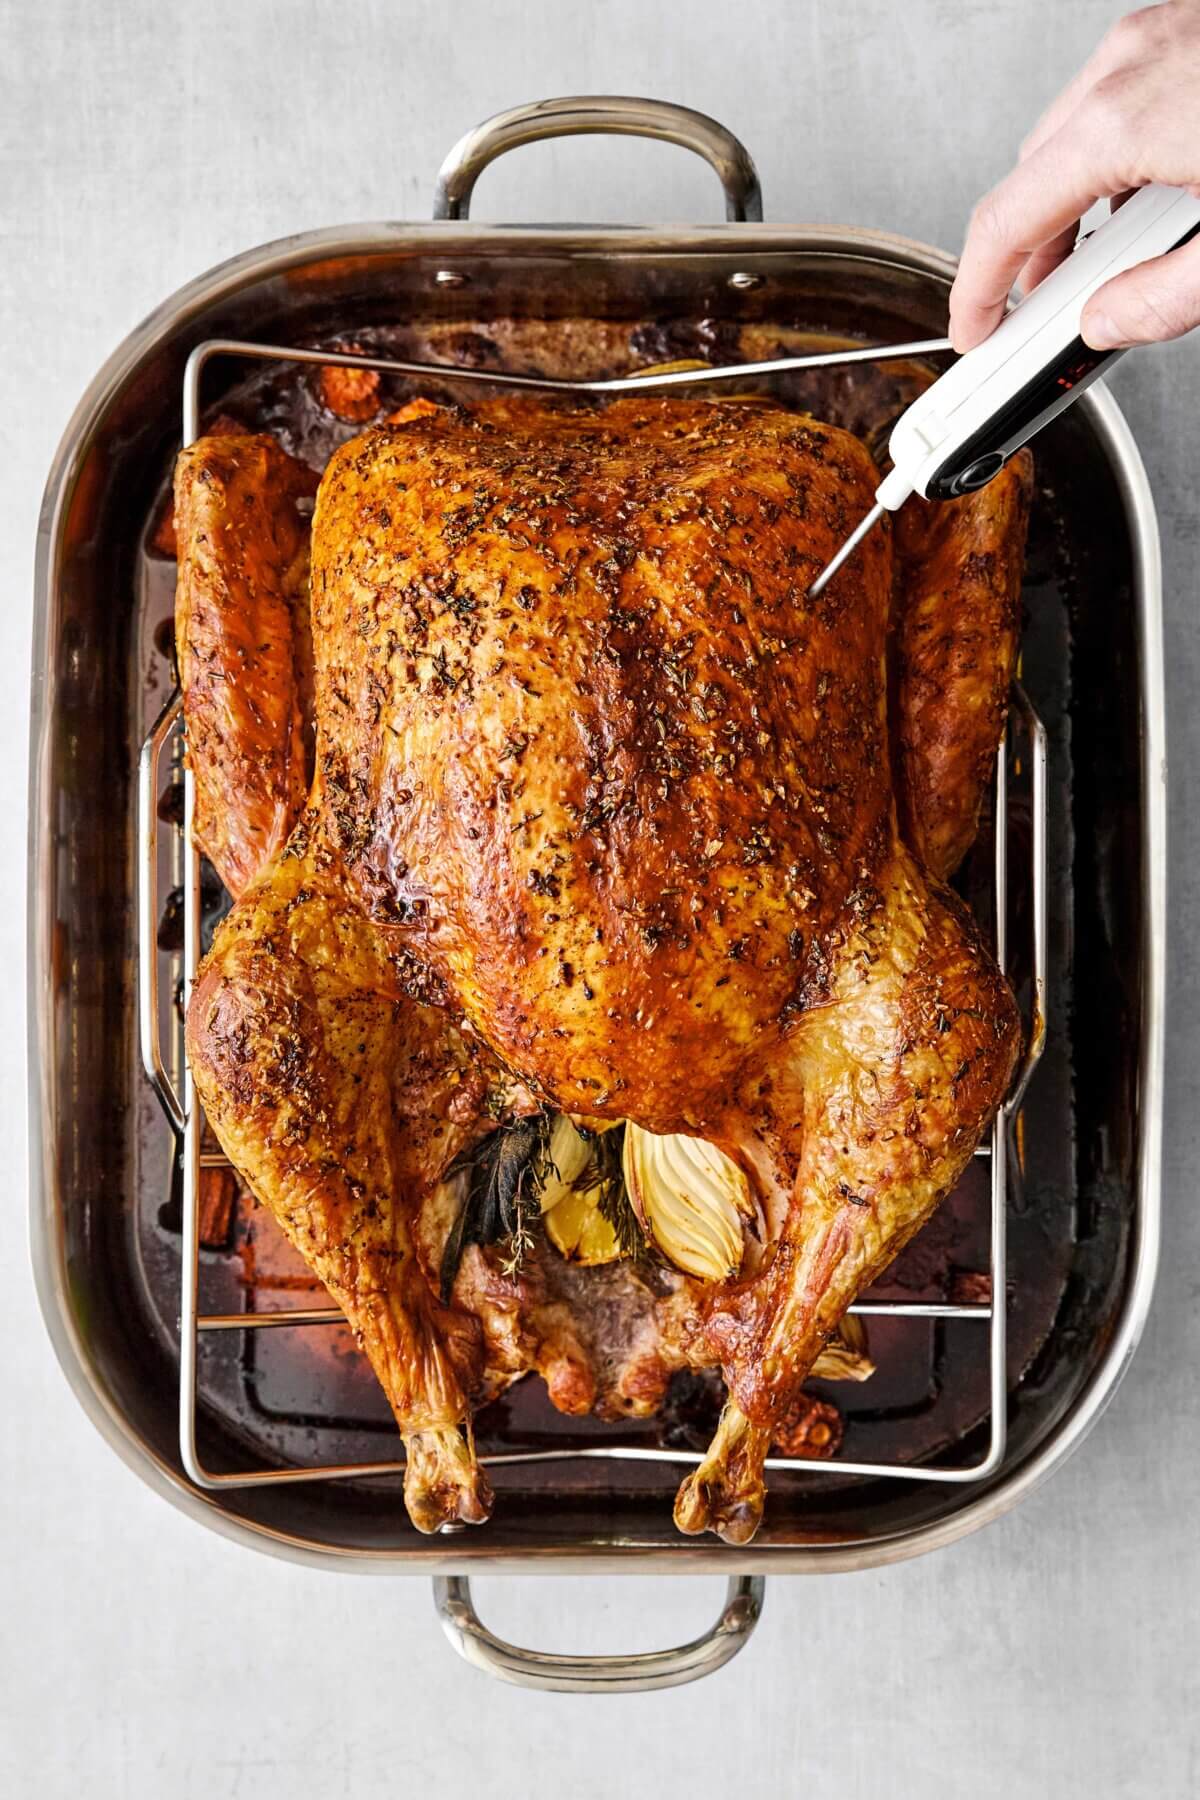
Step five: Cook the turkey. Place the turkey on a roasting rack or on a bed of veggies (or both, which is what I do). Then there’s only one thing left to do—cook the turkey!
How Long to Cook a Turkey
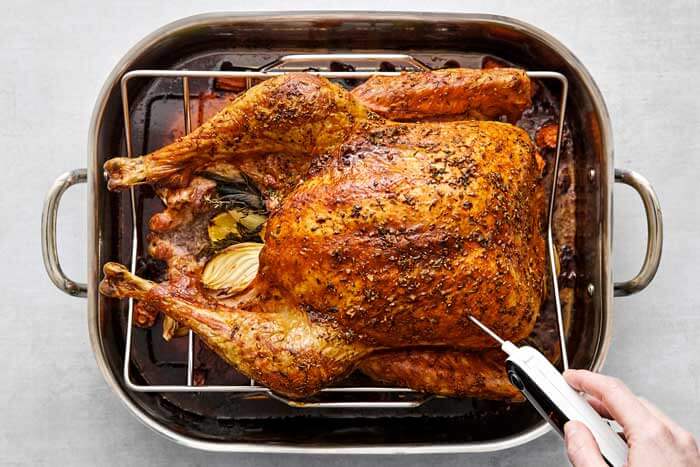
Ready for good news? Because we didn’t stuff the turkey, it will cook about 30 minutes faster. On average, plan for about 15 minutes per pound of turkey. But remember the BEST gauge is the temperature. You want to cook the turkey to 158° to 160°F (measure at the thickest part of the thigh or breast). But here’s a guideline:
- For a 10 to 14 pound turkey: 2 ½ hrs to 3 ½ hrs
- For a 14 to 18 pound turkey: 3 ½ hrs to 4 ½ hrs
- For a 18 to 22 pound turkey: 4 ½ hrs to 5 ½ hrs
Keep an eye on your turkey when it’s about 75% done. Then, check the temperature every 10 minutes. Remember that ovens can cook slightly hotter or cooler. If you notice the skin browning too quickly, you can always place aluminum foil on top.
Always Let Your Turkey Rest
Once you remove the turkey from the oven it’s imperative that you let it rest for at least 30 minutes. This allows the juices to redistribute in the meat, making for a juicer turkey. It’s much better to have a juicy turkey than a sopping wet cutting board!
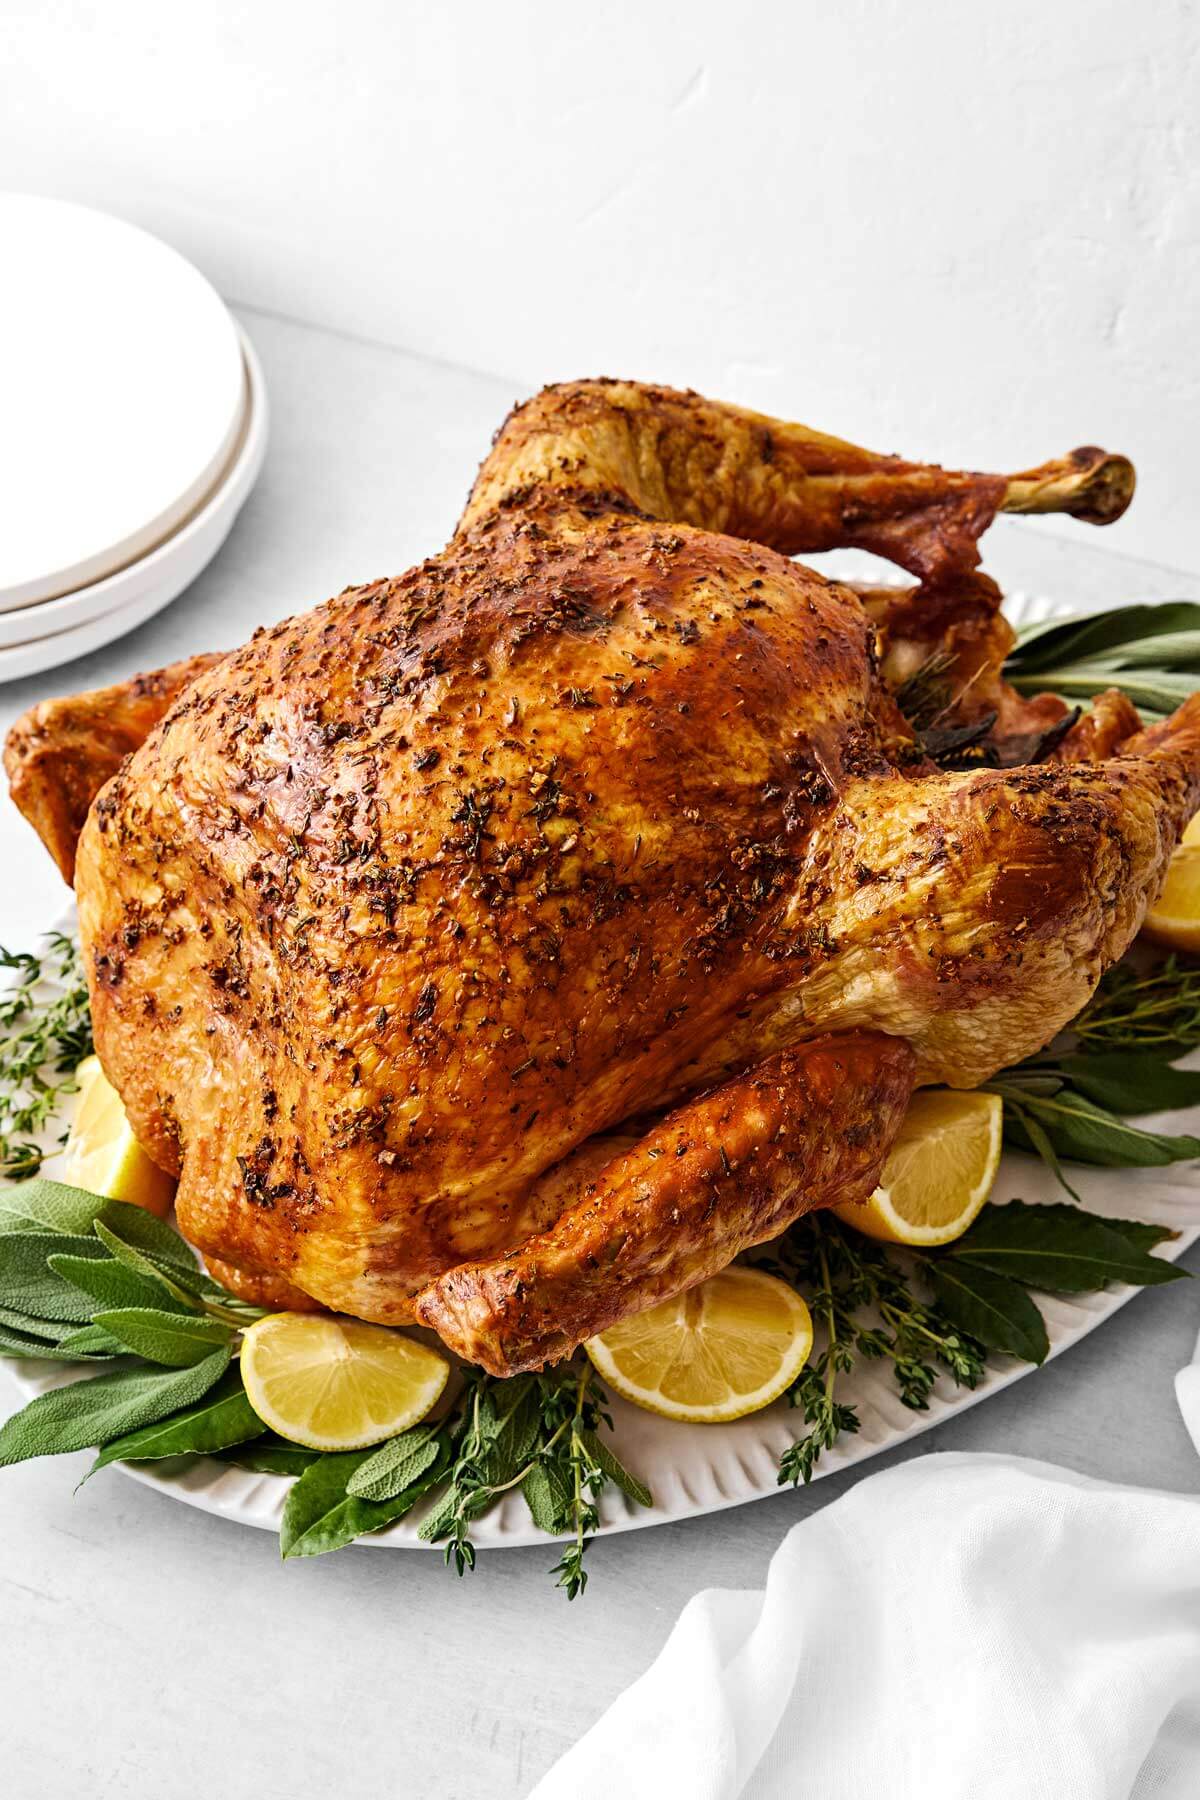
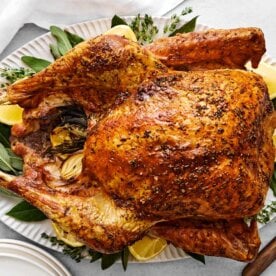
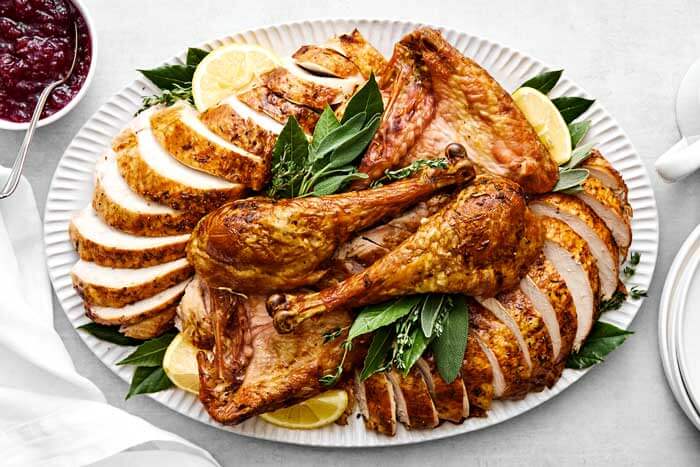
Carve and Serve Your Beautiful Bird
At this point, all that’s left to do is admire your gorgeous, golden turkey, carve it up, make a rich, flavorful gravy, and wow your guests. Follow my tips on how to carve a turkey to present it beautifully on the table. For a complete Thanksgiving spread, serve the turkey with:
- Cranberry Sauce: An essential Thanksgiving sauce!
- Mashed Potatoes, Mashed Sweet Potatoes or Mashed Cauliflower (for a low-carb option): You always need something creamy.
- Sweet Potato Casserole: My favorite holiday casserole.
- Honey Glazed Carrots: They’re beautifully caramelized.
- Creamed Corn: They add a vibrant pop of yellow to the table.
- Balsamic Bacon Brussels Sprouts: This side dish always disappears fast!
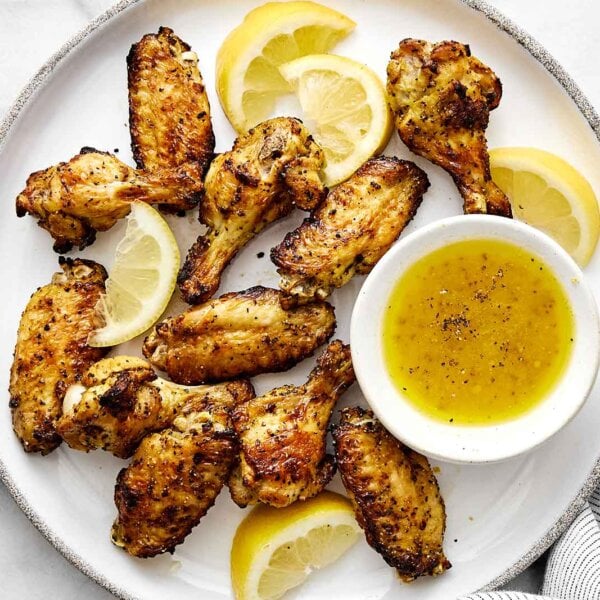
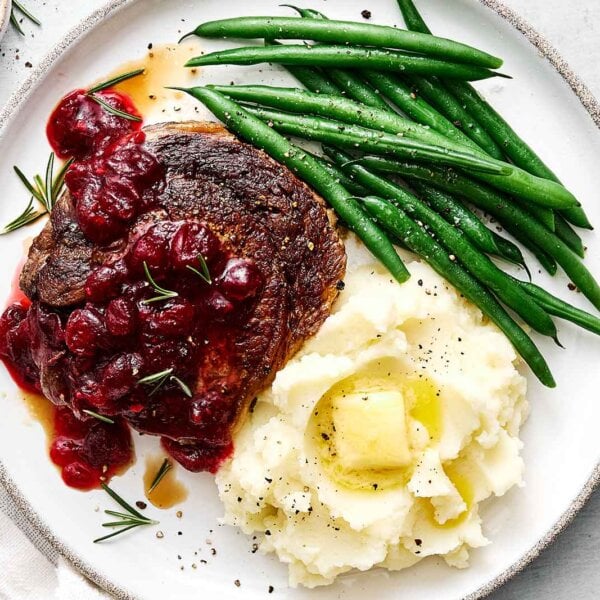
Need help with a timeline on the big day? Check out my Thanksgiving game plan and comprehensive Thanksgiving menu. And if turkey isn’t your jam, I’ve also got a stunning prime rib, beef tenderloin, or honey baked ham you can serve. Lastly, if you have turkey leftovers (which are always the best), transform them into a turkey soup, turkey cobb salad, or turkey casserole!
Common Questions
Your bird may be condensating or your butter may be too cold and firm. Make sure your turkey has come to room temperature for an hour and pat it dry with paper towels to remove moisture. You can also soften the butter for 5 to 10 seconds in the microwave, then it should spread easily.
If you’ve checked the temperature in the thickest part of the breast and thigh and it’s at 165F then it’s cooked through. If it’s not golden enough, you can always turn on your top broiler for just a couple of minutes.
Lower the temperature of your oven and cover it with aluminum foil. Also, I recommend buying an oven thermometer to double check if your oven is cooking too hot.
Make sure your turkey isn’t positioned too high in your oven. If you can, lower your rack. Then, cover just that part with aluminum foil.
It’s normal for there to be some pink on cooked turkey, especially if you have a young bird. As the USDA says, you need to go by temperature, not color. As long as your turkey is cooked to 165°F it’s safe to eat.
If you make this turkey recipe, I’d love to hear how it turned out in the comment box below! Your review (along with over a thousand other reviews on this recipe!!) really helps give confidence to other readers in the community. And if you’re hungry for more healthy food inspiration and exclusive content, join my free newsletter here.
Description
Video
Equipment
- Roasting Rack This is the one I've personally used for years.
- Carving Knife A quality carving knife is key!
- Probe Thermometer An essential tool for cooking the best turkey.
Ingredients
Roast Turkey
- 12 to 18 pound turkey (*see notes below about using a larger turkey), fully thawed
- 1 onion, peeled and quartered
- 1 lemon, quartered
- 1 to 2 sprigs fresh rosemary
- 1 to 2 sprigs fresh thyme
- 1 to 2 sprigs fresh sage
- kosher salt and black pepper
Herb Butter
- ¾ cup unsalted butter, room temperature
- 6 cloves garlic, minced
- 1 teaspoon kosher salt
- ½ teaspoon black pepper
- 1 tablespoon finely chopped fresh rosemary
- 1 tablespoon finely chopped fresh thyme
Vegetables Under Turkey (optional, but recommended)
- 1 onion, peeled and quartered
- 3 celery ribs, roughly chopped
- 2 carrots, roughly chopped
Instructions
- Bring the turkey to room temperature. Allow your turkey to come to room temperature by removing it from the fridge 1 hour before roasting. Then, remove the giblets.
- Fill the cavity. Preheat your oven to 325°F (160°C) and pat the outside of the turkey dry with paper towels. Season the cavity of the turkey with salt and pepper. Then fill it with the onion, lemon, and fresh herbs. If your turkey is smaller, don't overfill the cavity as you do want some airflow.
- Make the herb butter mixture. In a small bowl, make the herb butter by stirring the softened butter, garlic, salt, pepper, rosemary and thyme together.

- Rub the herb butter all over. Loosen the skin of the turkey gently by sliding your fingers underneath. Then rub about ⅓ of the herb butter between the skin and turkey breasts. Rub the remaining herb butter all over the entire outside of the turkey.

- Place on a roasting rack. Place the turkey on a roasting rack or on top of a bed of chopped vegetables (if you don't have a rack), or both! Tuck the wing tips under the turkey to prevent them from burning.
- Cook the turkey. Place the turkey in the oven and roast for about 15 minutes per pound, or until the internal temperature reaches 158°-160°F. You don't need to baste the turkey, but do keep an eye on it after it's about 75% done. If you notice the skin browning too quickly, you can place aluminum foil on top. To verify the temperature, place a thermometer into the meatiest part of the thigh or breast. The turkey will continue to cook once it's removed from the oven and will rise in temperature to 165°F, after it's rested.
- Let it rest. Let the turkey to rest for 30 minutes before carving. This allows the juices to redistribute, making for a deliciously juicy turkey. To keep the turkey warm, you can cover the turkey with aluminum foil on the counter.
- Carve and serve. The last step is to carve the turkey and serve it up on a platter. Make sure to follow my tips on how to carve a turkey. And don't forget to save the juices from the pan to make turkey gravy!
Lisa’s Tips
- You can certainly use a turkey larger than 18 pounds, but you may need a little more herb butter and you’ll need to cook it longer. If your turkey is less than 12 pounds, you may have a little extra herb butter, so you might want to reduce the quantity.
- It’s common for ovens to vary by up to 25 degrees, with some cooking hotter and others cooking cooler (my oven cooks cooler). So it’s best to verify how your oven cooks (before the big turkey day), by purchasing an oven thermometer and testing.
Nutrition
©Downshiftology. Content and photographs are copyright protected. Sharing of this recipe is both encouraged and appreciated. Copying and/or pasting full recipes to any social media is strictly prohibited.
This recipe was originally posted November 2020, but updated to include new photos and information for your benefit!
Behind The Scenes
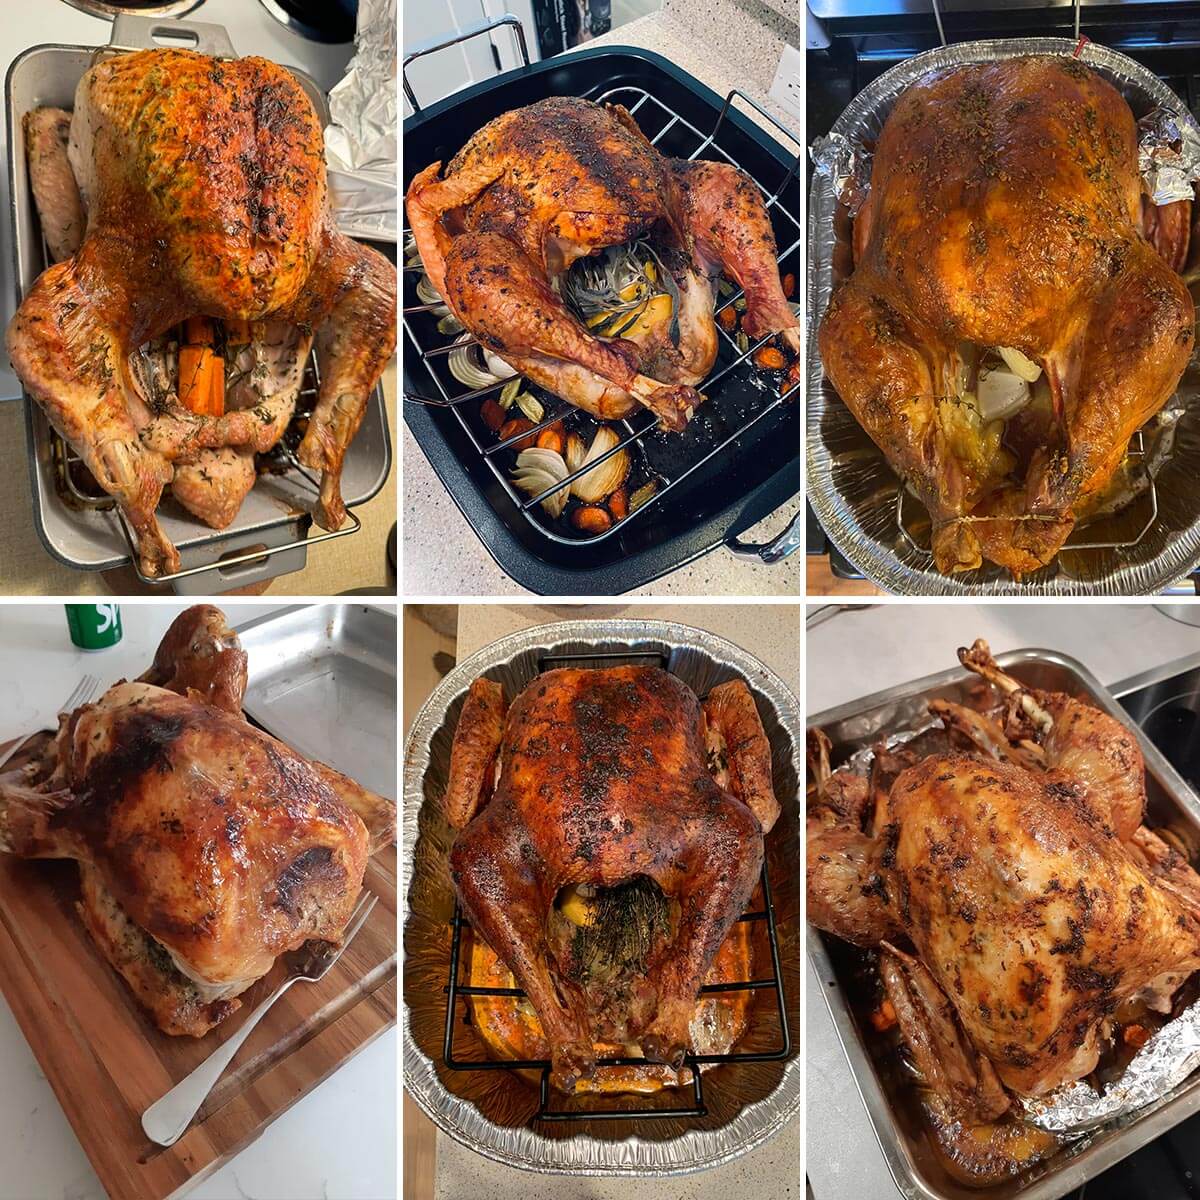
Normally, I show raw and candid photos from my kitchen in this “behind the scenes” section (often taken as I’m testing the recipe). But because this turkey recipe is sooo intimidating for newbies, I instead wanted to highlight YOUR gorgeous photos of turkey success!
Over the years, I’ve received hundreds of photos across social media (thanks for always tagging me!) with exclamations of happiness when your bird turns out beautifully golden and worthy of that Thanksgiving centerpiece spot. I wish I could feature them all here, but hopefully this handful of reader photos will convince you of just how foolproof this recipe really is!
Not the best recipe, tasted flavorless, and was dry.
I’ve never made a turkey before. I don’t have a roasting pan like you used but I do have a large disposable foil pan. It doesn’t have rack. Would this still work?
Hi Sarah – yes, that still works! Make sure to watch my video and I’ll walk you through the process. I’m sure you’ll do great!
Came out perfect, so juicy and tender and easy! Just needed to add alum. foil otherwise it would have burnt.
Hi there – Happy to hear your turkey turned out great!
Would I still have success with this recipe if I prepped and buttered the turkey the night before and placed it in the fridge?
If so, do I need to let the turkey come to room temperature twice? Room temp for 1 hr the night before buttering, and then room temp for 1 hour before putting in the oven?
I followed this recipe as is and it turned out great! I really appreciated the video also. It made me feel much more confident about the prep and the carving!
Hi Lara – Happy to hear the video was helpful and that your turkey was a success this Thanksgiving!
This is by far the best turkey I have ever made! Thank you Lisa for the tips and tricks! I love how simple and delicious our turkey was this year! I will always cook my turkey like this from here on out!
Hi Letitia – Thrilled to hear your turkey turned out perfectly this year!
The absolute best Thanksgiving turkey we’ve ever had! Such an easy recipe, and wow… the breast meat was soooo moist and tender, we could cut it with a fork! I used a Trader Joe’s 14lb “young turkey”, and it took 3 hours and 15 minutes. The only things I did that weren’t part of this recipe (for preference): added some chicken stock to the bottom of my roasting pan (under the rack) for some extra moisture, and I added cut up oranges to the cavity too, for extra citrus. But it would be just as amazing without those additions, too! Thank you so much for sharing your recipe, because now I’ll always be confident in my Thanksgiving turkey! :)
Hi Sara – I love the addition of citrus you added! I’m so glad your turkey was a success this year and I can’t wait to see it again next year on your dinner table!
Best Turkey Ever, awesome recipe. The turkey was moist and delicious.
Yay, happy you loved it, Sheryl!
Hi Lisa can you replace butter by olive oil? Or half butter, half olive oil? Thanks!
Hi Nadine – yes, you can do that if you’d like. If you have my cookbook, I have a turkey breast recipe in it that just uses olive oil in it (as an example). Enjoy!
Loved this recipe! My turkey turned out so moist and flavorful. This recipe is definitely a keeper and I’ll be making it every year from now on. Thanks for sharing and for all the helpful tips.
Yay, I’m happy you loved this turkey recipe, Barb! Wishing you a very Happy Thanksgiving!
My very first time baking a turkey and I used this recipe. It came out perfect. The whole family was blown away with the juice and flavor. We always just tolerated turkey and this year it was a favorite. Thank you!
Turkey is super delish when it’s cooked right. So happy you were able to experience that now, yay!
This was my 3rd year making this turkey! It turned out so well. It lookd great & tasted delicious! I wish I could add a picture!
Hi Karen – thanks for coming back to make this turkey recipe year after year. I’m so thrilled you love it. And if you share a photo on social media, make sure to tag me!
I made your turkey recipe for work, and home…and I have to say it was fantastic. Thank you so very much for your time showing us how to make the most amazing dishes.
You’re more than welcome, Tracey! I’m so happy you loved it.
I am 13 years old and this was the first turkey I have ever made! My entire family of 10 devoured almost the entire 15 pound bird, and I am now responsible for it every year. :) Thank you so much for this recipe!
Hi Kendall – You are amazing!! Well done on your first turkey, that’s wonderful! And your family is obviously very smart to put you in charge of it every year now, haha. Happy Thanksgiving!
I used this recipe for my turkey this year and my family loved it!! Do you think it would still taste good if I used a chicken??
Everyone raved about the turkey! It came out so juicy! Will be my go to recipe from now on!
Love to hear that, yay!
I was so thrilled with the results of this turkey I HAD to write a review! This will be my “go to recipe” for turkey now. It was SO moist and flavorful! Thank you for an easy, no fail recipe. Also, thanks for giving such detailed and helpful instructions!
Hi Jane – thanks so much for taking the time to write a review. I really appreciate it! And I’m even happier that you loved this turkey recipe. :)
Can you use vegan butter instead like Earth Balance
Hi Cindi – yes, no problem. Enjoy!
Disappointed. Very dry. My way of marinating and seasoning, turkey is moist.
The turkey was perfect!! I got compliments from the whole family and we had a great thanksgiving meal! Thank you so much!! 🧡
I’m happy everyone loved it! Happy Thanksgiving, Kelly!
I have been making Thanksgiving turkeys for 50 years. I thought I would try Lisa’s recipe because it sounded so much easier. My company raved about it and said it was the best turkey they had ever had. No lie. And it is crazy simple to make. But, I recommend tenting the breast halfway through because the thighs were still very much undercooked when the breast reached 160°. I don’t take my whole turkey to the table, so you could also do what Ina Garten does. When the breast meat reaches 160°, take it out of the pan, cut the thighs and legs off, throw them back in the pan and keep cooking till they are done. I made the herb butter two weeks ahead andfroze it. This is the easiest recipe. No brining at all. This will definitely be my permanent go to recipe for Thanksgiving turkey. Thanks Lisa!
Hi there – I’m so glad this turkey recipe was such a hit! Thanks for sharing your experience and I can’t wait to see you make this again next year.
This was my 2nd year using this recipe, and it’s the only one I’ll use from here on out. Once again, the turkey received rave reviews–and once it took my first bite, I had to agree–it was delicious!! I followed the recipe pretty much exactly as written with the exception of garlic in the herb butter (I left it out). Can’t wait to use it again at Christmas!
Thanks so much, Jen! I’m happy you enjoyed it for your second year in a row, and hope it turns out just as delicious again at Christmas. :)
Unfortunately this did not go well. My turkey was 15 lbs. So I planned to cook it for 3 hrs and 45 mins. I decided to check it at the 3 hr mark to get an idea of how much longer to let it cook. and it came out at 190+ degrees! I checked several other spots and it was clear it was way over done. So I took it out, let it rest 30 mins. Carving was super difficult for me but that’s on me, first time. Whatever juice there was was all over my counter. It was bad, really dry, even the dark meat was dry. I don’t think my oven is off. Other stuff comes out right like pizzas, steak in the cast iron pan, chicken thighs, etc. I think 15 mins per lb is just waaaaaay too long.
Absolute best turkey I ever made. I did leave the lemon out since I forgot to buy it and threw extra celery in the cavity with a little of the herbed butter. Soooo moist! My kids fought over the skin.
Yay, so happy for your turkey success, Susette! I’d fight for the skin as well. ;)
Absolutely amazing!! Meat was juicy and flavorful, first time making turkey for thanksgiving and easy recipe to follow and do, everyone loved it, definitely doing it again next year!!
Awesome, sounds like a perfectly cooked turkey! Can’t wait to see you back here again next year. :)
My first time cooking a turkey, but these instructions was perfect for me. As it worked out well. Thank you so much.
So happy you loved this recipe, Ravi!
Thanks to you, I baked the most tender turkey ever!! Following this recipe got me rave reviews from my family!
Woot, love to hear that! Congrats on your turkey, Angela!
Completely forgot to stuff the turkey with lemon and onion. Regardless this was flavorful and moist. Keeper of a recipe!!!
Happy you loved it, Terra!
My husband put the oven at 350 instead of 325 is there going to be a significant cooking time difference?
Hi Katelynn – yes, your turkey will be done sooner when cooked at 350F. Make sure to keep an eye on the internal temperature of the turkey. And if it browns too quickly, you can always cover it with foil.
This didn’t work for us. Turkey wasn’t cooked or evenly browned. I’ll go back to cooking at 350 rather than 325 next year. We did enjoy the mix of herbs in the cavity.
The first time I planned to make a Turkey I spent a couple of months looking at recipes. I was very intimidated about cooking a turkey. when I picked a recipe I chose to go with this one, I have no regrets this is the absolute best recipe, the turkey comes out delicious, not only that this recipe is easy for first timers. This is my second time using this recipe.
Hi Heather – thanks so much for trusting my recipes. I’m thrilled you loved this turkey!
You don’t cover the turkey? With tinfoil?
Hi Katie – With this recipe, I find that you don’t need to!
Hi! What do you do with the turkey neck and giblets?? Do they cook in the cavity, or should this be done separately?
Hi Rachel – no, don’t cook the turkey neck and giblets in the cavity. Make sure to remove those. You can always cook them separately or use them in making turkey stock. Happy Thanksgiving!
Hi Lisa! Im actually making this recipe right now and have a question… I dried the turkey off with a paper towel, like suggested, before rubbing the herb butter onto it, however, it is still not sticking like pictured, its just running down and off the sides of the turkey. What am I doing wrong?
Also, I do not need to add any type of broth/water to the bottom of my, correct?
I’m not a very good cook so im wondering when the recipe says salt and pepper the inside and outside of turkey- how much salt and pepper should I use to salt a 14 lb turkey?
Also should I use blue diamond salt? Or se salt?
Hi Geri – make sure to give my video a watch, so you can see about how much I use. And I use kosher salt, but sea salt is fine as well. Enjoy!
Thank you for sharing this amazing recipe! I made it for Thanksgiving last year and everyone raved about it being the best turkey they’ve had! I thought so too and made it again at Christmas. Absolutely delicious! This is the recipe I will always use now.
Yay, thanks so much for making it again and again, Jessi! Happy Holidays!
How much butter for 20lb turkey?
Hi Anna – you could add another 1/4 cup or so if you’d like, given your larger bird. Enjoy!
What temperature do I set the oven at?
Hi Ginger – the oven is set to 325F.
Hi Lisa,
Do you put the roasting pan in the oven when you preheat it?
Hi Denise – let the oven fully preheat first, then you can cook your turkey. Happy Thanksgiving!
Can you use dry herbs in the butter and in the cavity if you don’t have fresh.
Hi Barbara – yes, you can do that. Use about 1/3 the amount of dried herbs to fresh herbs. Happy Thanksgiving!
For dried rosemary and thyme how much would you use for a 15.8 lb turkey?
First time making it and it was so easy and everyone loves the smell and how it tasted. Will be making it next year again
So happy you love this turkey, Maria! Happy Thanksgiving!
For a bigger turkey do you need more onion lemon and herbs inside?
Hi Kelli – you can add more if you’d like, and if you can fit it in there. :)
Exelent your my new hero thank you
You’re more than welcome. Enjoy your turkey, Stephen!
Super yummy, moist bird!! Thank you for the easy delicious turkey recipe ! Happy Holidays ! Alison from Tucson
So happy you loved it, Alison! Happy Thanksgiving!
Oops forgot to add, it’s a brine where you put the mix in water then brine the turkey in a brine bag over night.
Yes, that’s fine. You can then still apply the herb butter and cook as per my instructions.
Help. Can I use this recipe after it’s brined in a store bought brine kit? First time cooking turkey and have no idea what I’m doing.
Hi Diego – yes, no problem!
Hi Lisa! Can you but the butter on the turkey the night before so all you have to do that day is put it in the oven?
Hi Molly – yes, you can do that. But make sure to still let your turkey come to room temperature before cooking in the oven. Enjoy and Happy Thanksgiving!
Hi! Cooking this today and wondering if using a turkey bag will tamper with the outcome?
Hi Emma – you can still use a turkey bag with this recipe, though I don’t feel it’s necessary.
Hi there. So the turkey cooks with no foil? What do you think of oven bags? Ive been using for years.
Hi Monique – you don’t need any foil, unless there are “hot spots” on the turkey that are browning faster than the rest of it. And no, I’m personally not a fan of cooking my turkey in plastic and don’t think it’s necessary for the best, juiciest turkey recipe. :)
How much herb butter would I use for a 24lb turkey? And how long for cooking?
Hi Kelli – you might want to add 50% more, or you could 2X it. For cooking, always go by internal temperature on the turkey. Happy Thanksgiving!
What about the inside stuff? Do I need to double to onion lemon and herbs?
Hi! Is it okay to do a dry brine beforehand even though you said it’s not necessary? Thanks!!
Hi Rachel – yes, you can do that. Enjoy!
Thanks for the recipe. I was wondering about the onion. Do you use yellow sweet onion or just yellow onion?
Hi Ron – either onion works, but I usually use regular yellow onion.
This is the BEST turkey recipe. I’ve cooked turkey for 30 years and this is so foolproof, easy, and the results are amazing. BIG success at last year’s Thanksgiving, will repeat this year.
QUESTION for you please: would it improve moisture & taste to baste the turkey? My concern is that the oven loses heat with each basting, so how to accommodate for the heat loss?
Thank you!
Hi Ann – so happy you love it! Basting isn’t necessary with this recipe, though you can of course do so if you’d like. It’s really up to you. Wishing you a very Happy Thanksgiving!
Hi Lisa! Excited to try this recipe! Question… what do you do with the vegetables used on bottom of Turkey afterwards?!
Hi Francesca – those would be great in a turkey stock! Hope you enjoy this turkey recipe and have a wonderful Thanksgiving!
This recipe is amazing!! I’d never made a turkey before this, but it got rave reviews from my guests. A few people said it was the best turkey they’ve ever had & it was so simple to make!!
Oh yay, I always love to hear that! Thanks so much, Hannah. I’m thrilled you and your guests loved it. :)
Going to try this for first time as I usually do the bag but don’t get the crispy outside. I’m wondering, is using chicken broth at bottom helpful to keep juicy?
Hi Kathleen – yes, a little broth in the bottom of the pan helps to keep the turkey nice and moist. Hope you love it!