Are you ready to make the BEST Thanksgiving turkey recipe? Trust me, it’s easier than you think!
My foolproof turkey is juicy, golden, and packed with flavor—without the hassle of brining or basting. With just a few simple steps you’ll have a perfectly cooked turkey that’s tender on the inside, crispy on the outside, and sure to impress everyone at your Thanksgiving, Christmas, or holiday dinner table!

Why You’ll Love This Turkey Recipe
There’s something about cooking a turkey for Thanksgiving that intimidates a lot of people. I totally get it. I remember being intimidated the first time I roasted a turkey and worried about overcooking it or serving a dry bird to a table of family and friends. But here’s the good news: cooking a turkey is actually super easy! Just think of it as cooking a really large chicken (I’m being serious). It might take longer to cook, but the process is almost identical. And while some people get fancy with expensive equipment, gadgets, and smokers, you don’t need any of that to make a classic, ultra-flavorful, and juicy turkey. Here’s why you’ll love my recipe:
- Simple, step-by-step instructions. It’s perfect for first-time turkey roasters and I’ve got a video below that walks you through everything.
- No brining or basting required. I’m all about keeping things simple and stress-free.
- Incredible flavor. All you need are a few key aromatics and my herb butter mixture.
- Perfect results every time. The most important thing! This recipe delivers an absolutely beautiful, juicy, and golden turkey for your table.
Roast Turkey Ingredients
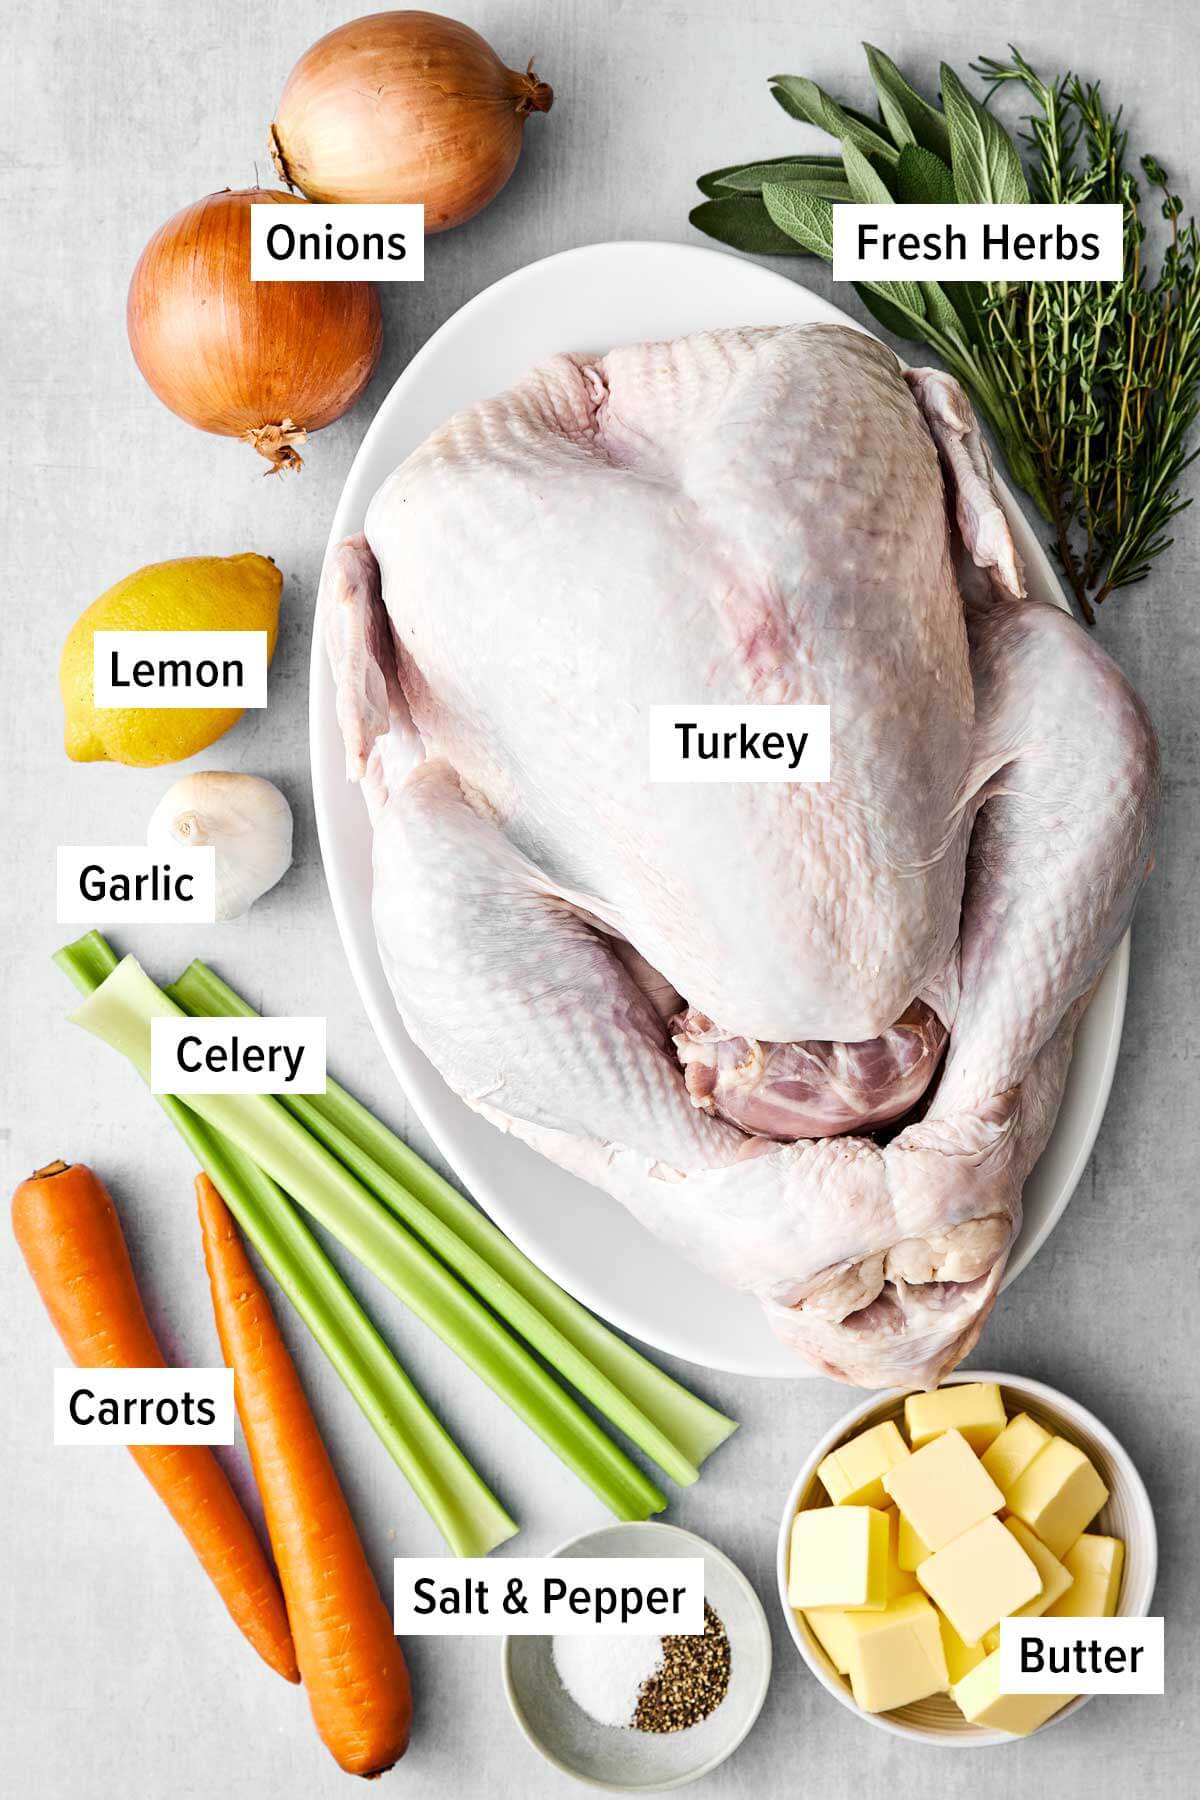
- Turkey: Any whole frozen (or fresh) turkey at the market works. For details on what size is best, read below.
- Fresh Herbs: Rosemary, thyme, and sage are classic poultry herbs. And while you can use dried, I do think fresh imparts a more robust flavor.
- Onion and Lemon: These go inside the turkey to help keep the meat moist and infuse it with fresh flavor.
- Garlic: An essential ingredient for that savory, garlicky skin that everyone desires.
- Butter: A generous amount of butter makes for a juicy turkey without the need to brine. Now there’s some time savings!
- Salt and Pepper: For that perfectly seasoned bird!
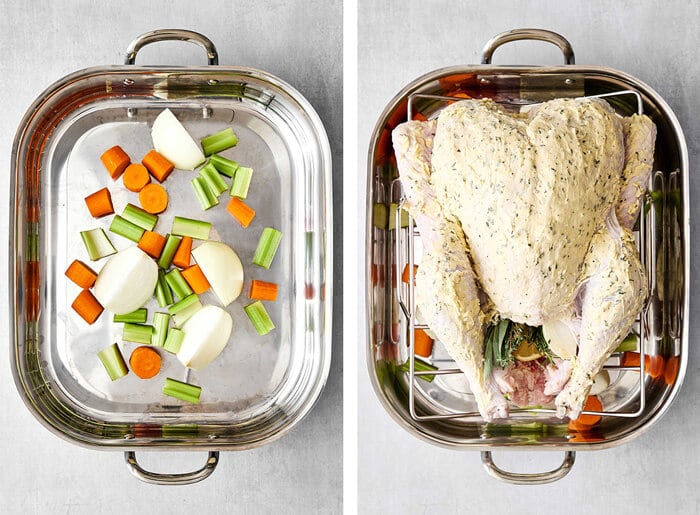
Pro tip: I also put vegetables under my turkey (like celery, carrots, and onion) while it’s roasting. This isn’t required, but I do recommend it. Not only will it amp up your turkey recipe, but it will take your turkey gravy flavor to the next level too!
Find the printable recipe with measurements below.
What Size Turkey to Buy?
The general rule of thumb is 1 pound of turkey per person. Or 1 ½ pounds of turkey per person if you want leftovers (and we always want leftovers, right?). It’s always best to have a little extra turkey than not enough, so I recommend:
- Less than 8 people: While it will be more turkey than you need, I recommend buying a 10 to 12 pound turkey. Anything smaller and you’re paying more for bones rather than meat. Remember, you can freeze turkey leftovers.
- For 8 people: Get a 10 to 12 pound turkey
- For 12 people: Get a 14 to 18 pound turkey
- for 16 people: Get an 18 to 24 pound turkey
- More than 16 people: It’s best to buy two turkeys rather than one monster sized turkey.
Don’t Forget to Thaw The Turkey
The biggest mistake people make is buying a frozen turkey the day before Thanksgiving. Don’t do that! Remember that a big turkey is going to take a while to defrost in the fridge. It takes about 24 hours per 5 pounds of turkey to properly thaw. My recommendation: follow my Thanksgiving timeline and buy your turkey at least a week before Thanksgiving. Then, let it thaw in the fridge 3 to 4 days before the big day.
No, You Don’t Need to Wash It
All you’ll do is contaminate your sink and kitchen and make a mess. We’ve talked about this before with chicken, and the same applies to turkey. Any bacteria on the turkey will get killed in the oven while baking.
Don’t Cook Stuffing In the Turkey
If you want perfectly cooked stuffing and perfectly cooked turkey, cook them separately. If you overfill the cavity of the turkey it slows down the cooking time. Plus, it’s better to fill the turkey with aromatics and herbs that give it incredible flavor and moisture. So cook your stuffing in a casserole dish instead.
Equipment You’ll Need
There are three basic kitchen items you’ll need to roast your turkey—a roasting tray, thermometer, and a sharp knife.
- Roasting Tray: You can buy an expensive roasting tray, a solid mid-priced roasting tray, or use a cheapie disposable roasting tray. They all work just fine.
- Thermometer: The same goes for thermometers. You can use a probe thermometer (that you leave in the turkey), an instant read thermometer (what I most often use), or a basic meat thermometer.
- Knife: Of course, a sharp knife is essential! I have this carving knife and fork set.
How to Cook A Turkey
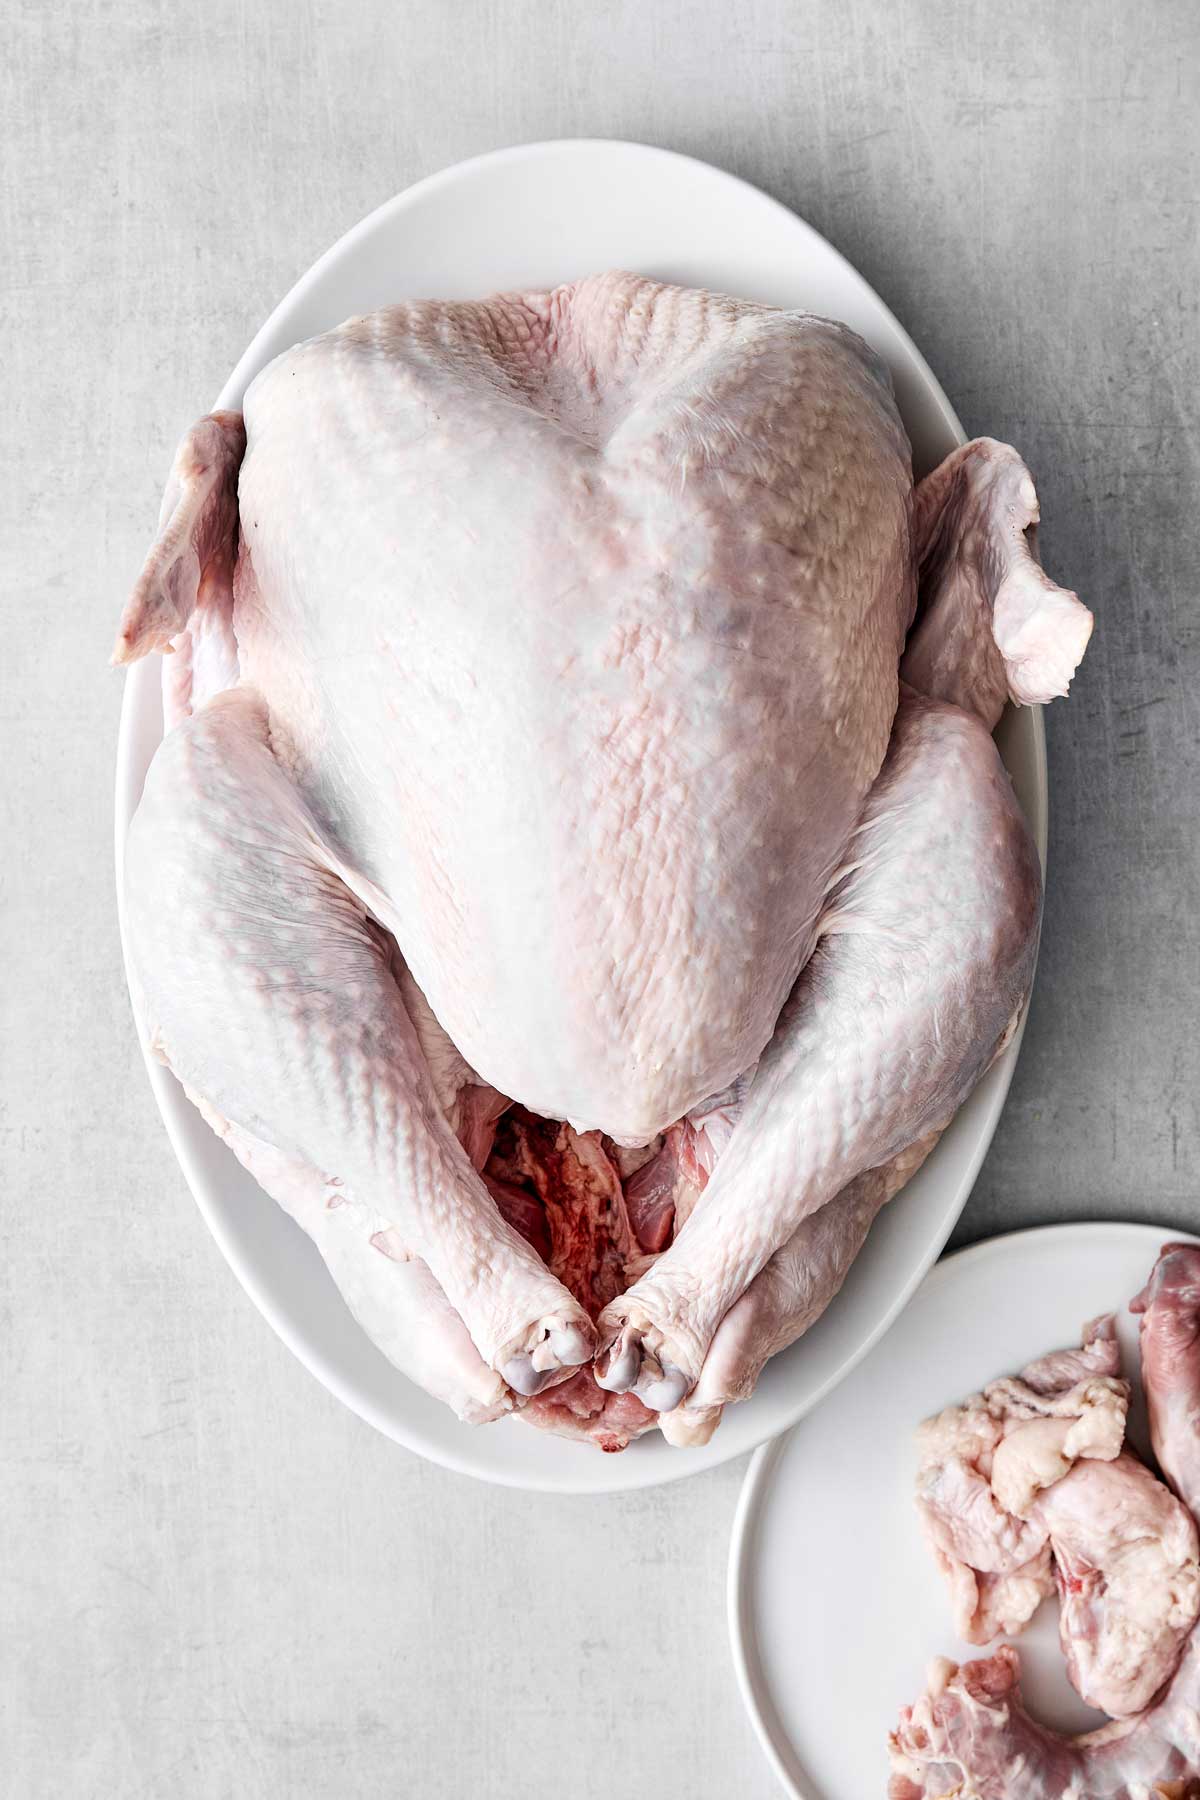
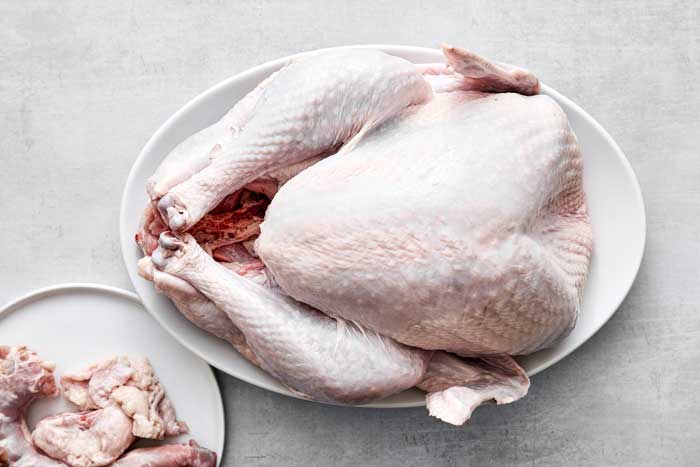
Step one: Thaw the turkey and remove the giblets. Once your turkey is thawed, let it rest at room temperature for an hour. Remove the bag of giblets and the neck, found in the large cavity and sometimes the smaller neck cavity (check both areas just to make sure you got everything out). You can save these items for gravy or discard them.
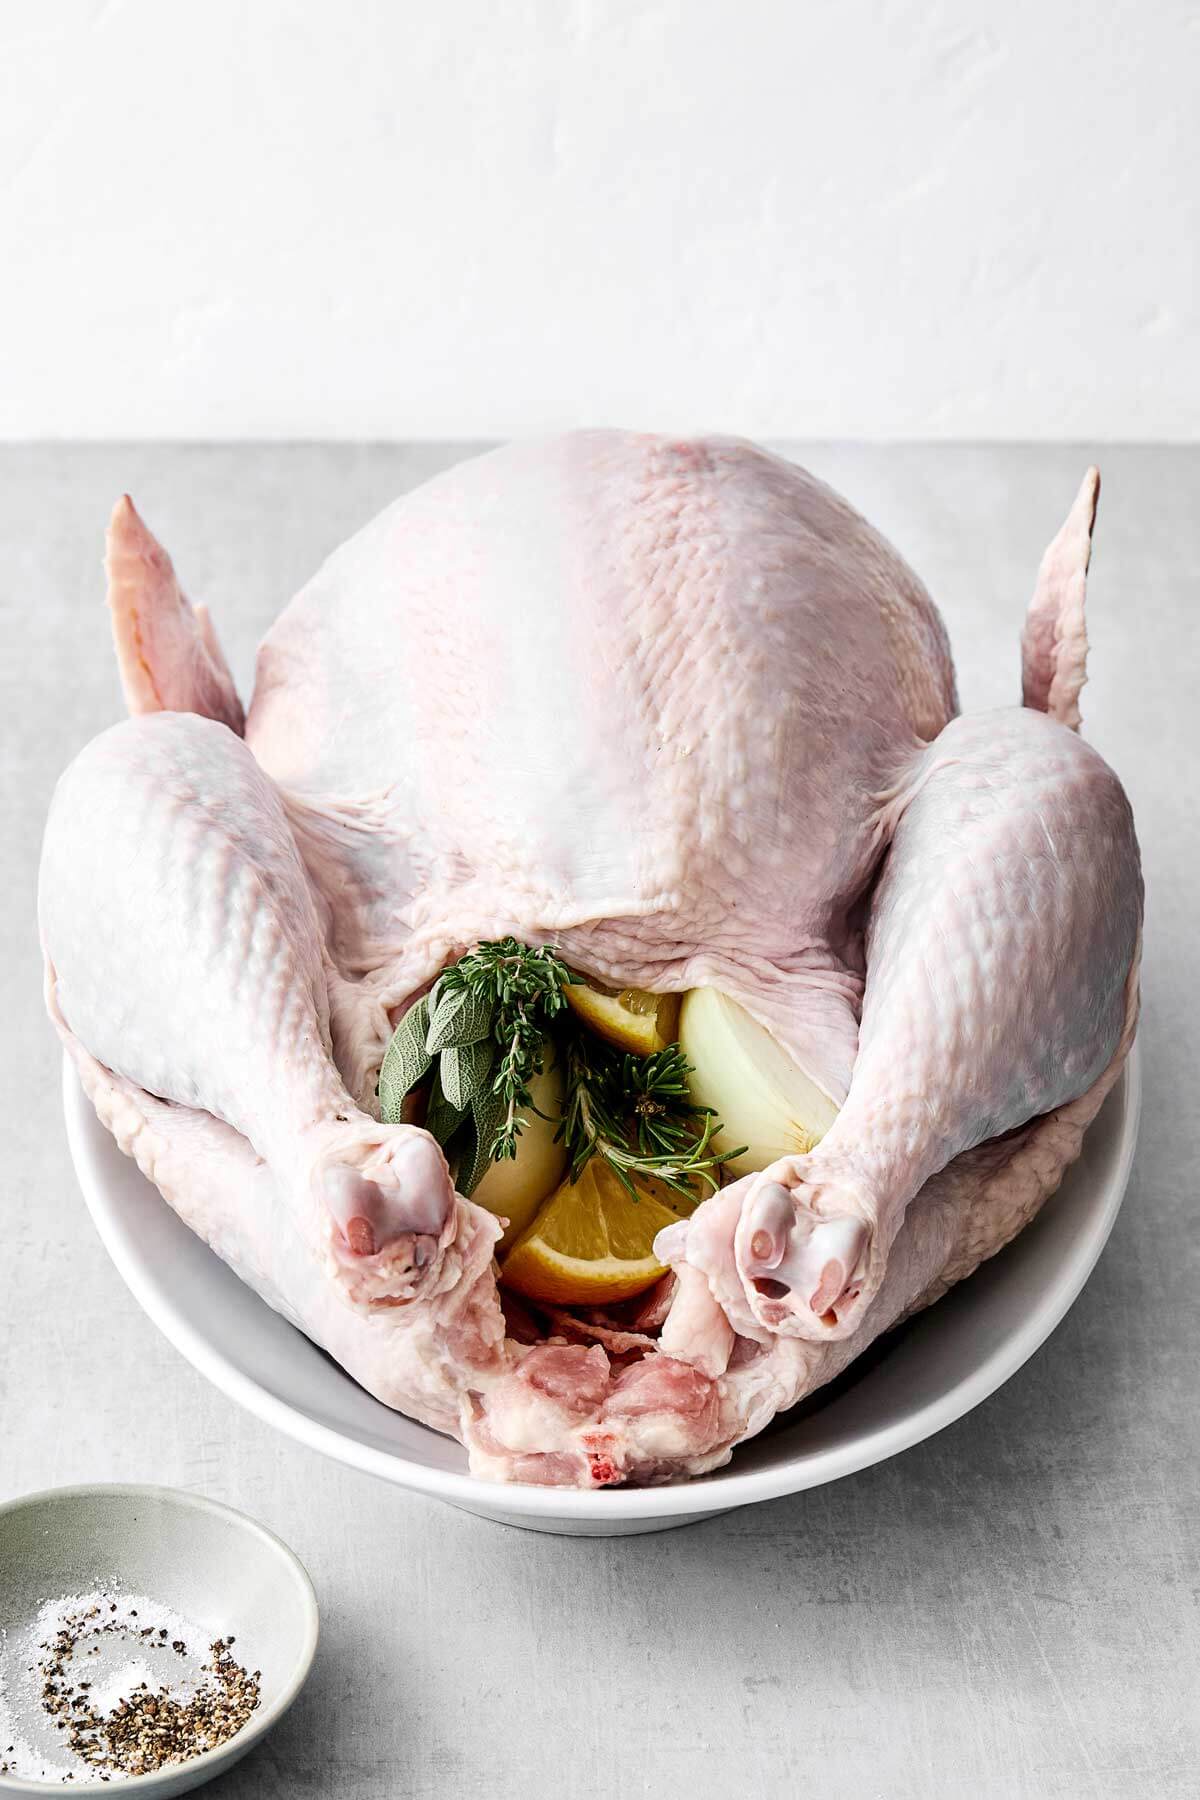
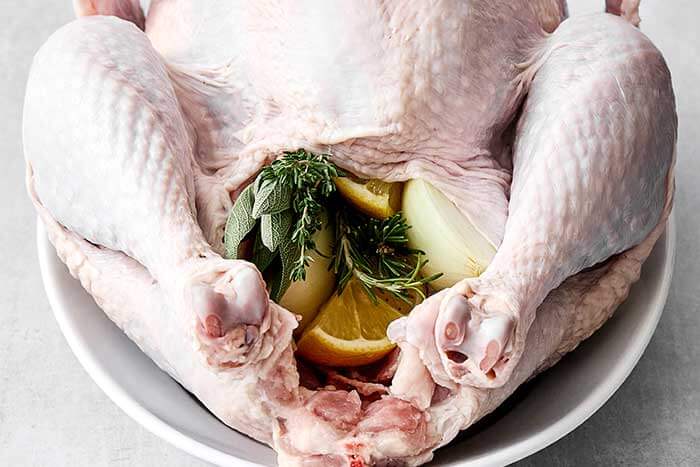
Step two: Pat it dry and fill the cavity. Pat the turkey dry with a paper towel (this is key to getting that extra crispy skin!). Then, season the inside of the turkey generously with salt and pepper, and stuff the cavity with quartered onion, lemon wedges, and fresh sprigs of herbs. If anything, go lighter on the sage than the other herbs, as it’s more potent.
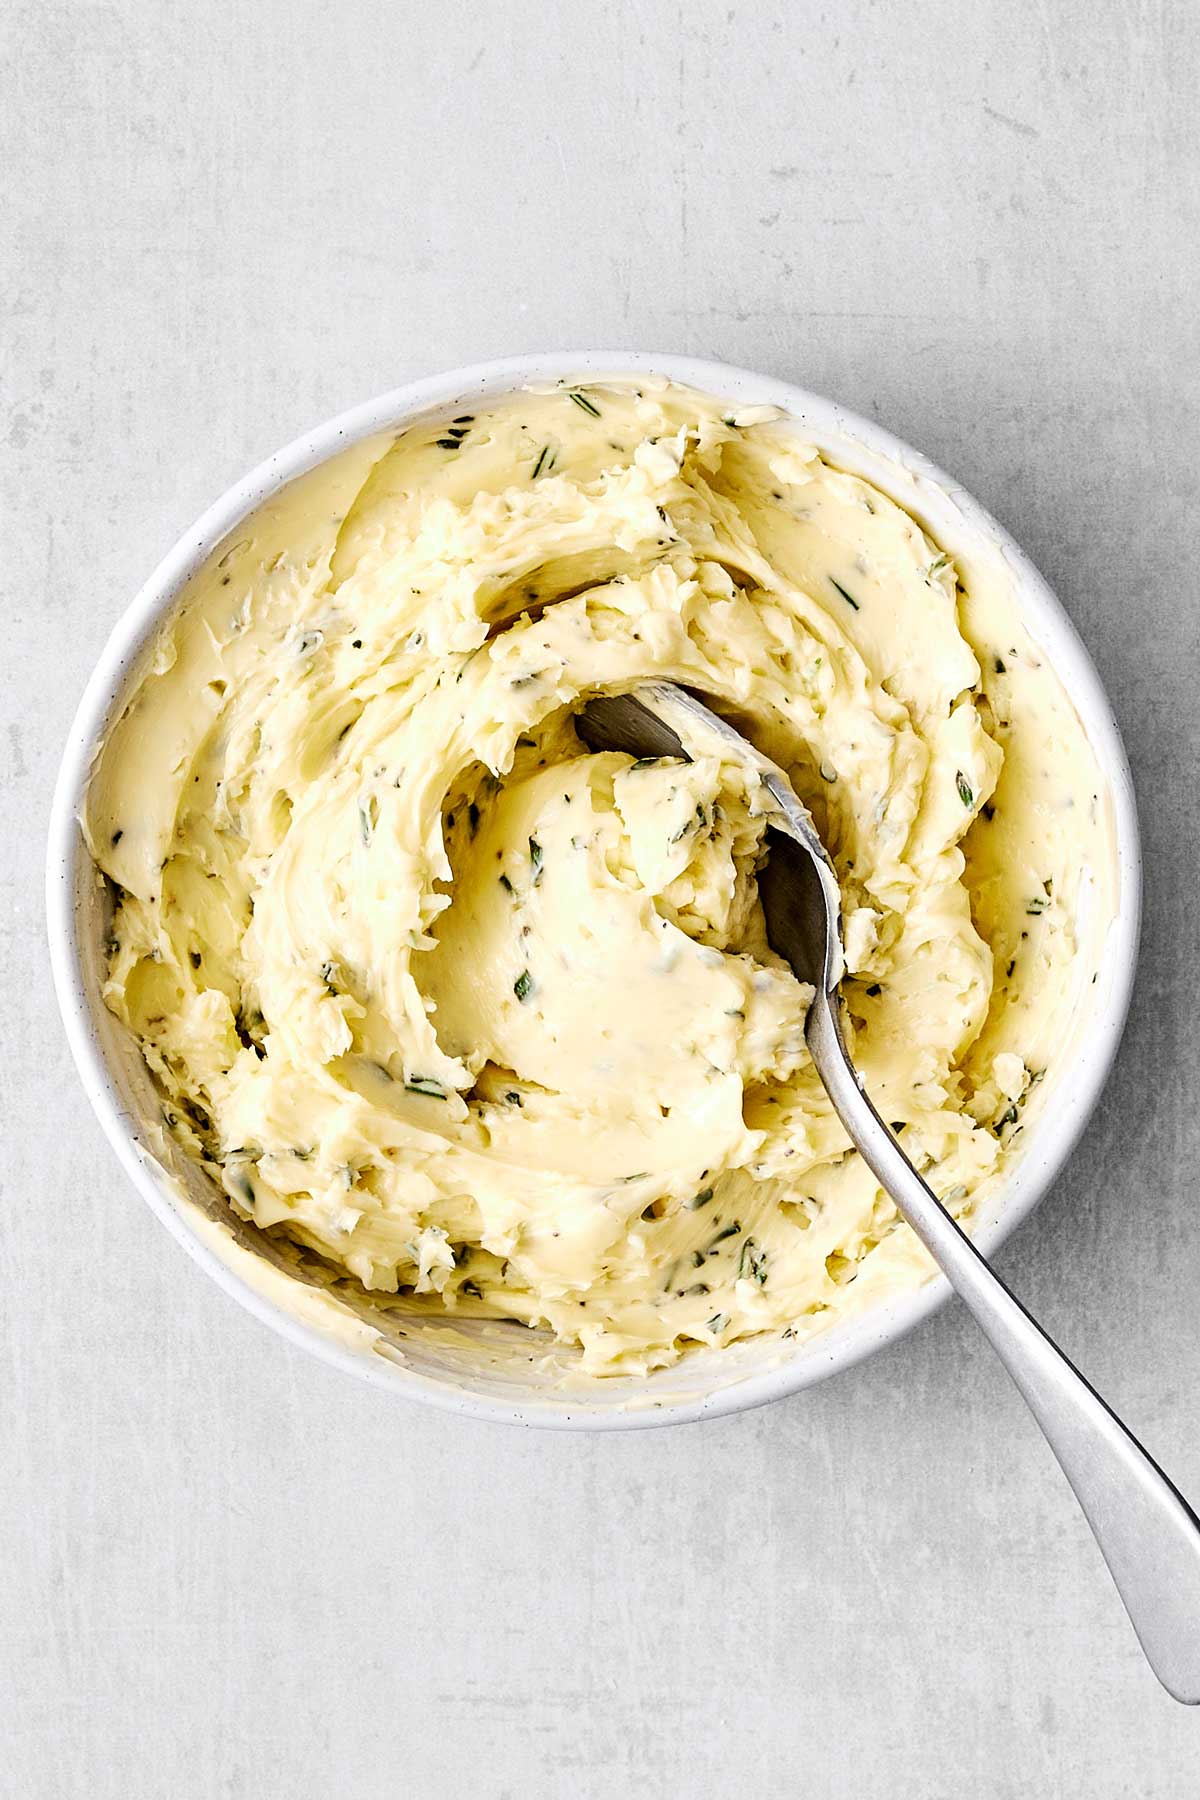
Step three: Make the herb butter mixture. Make the herb butter by stirring together the softened butter, garlic, salt, pepper, rosemary and thyme in a small bowl.
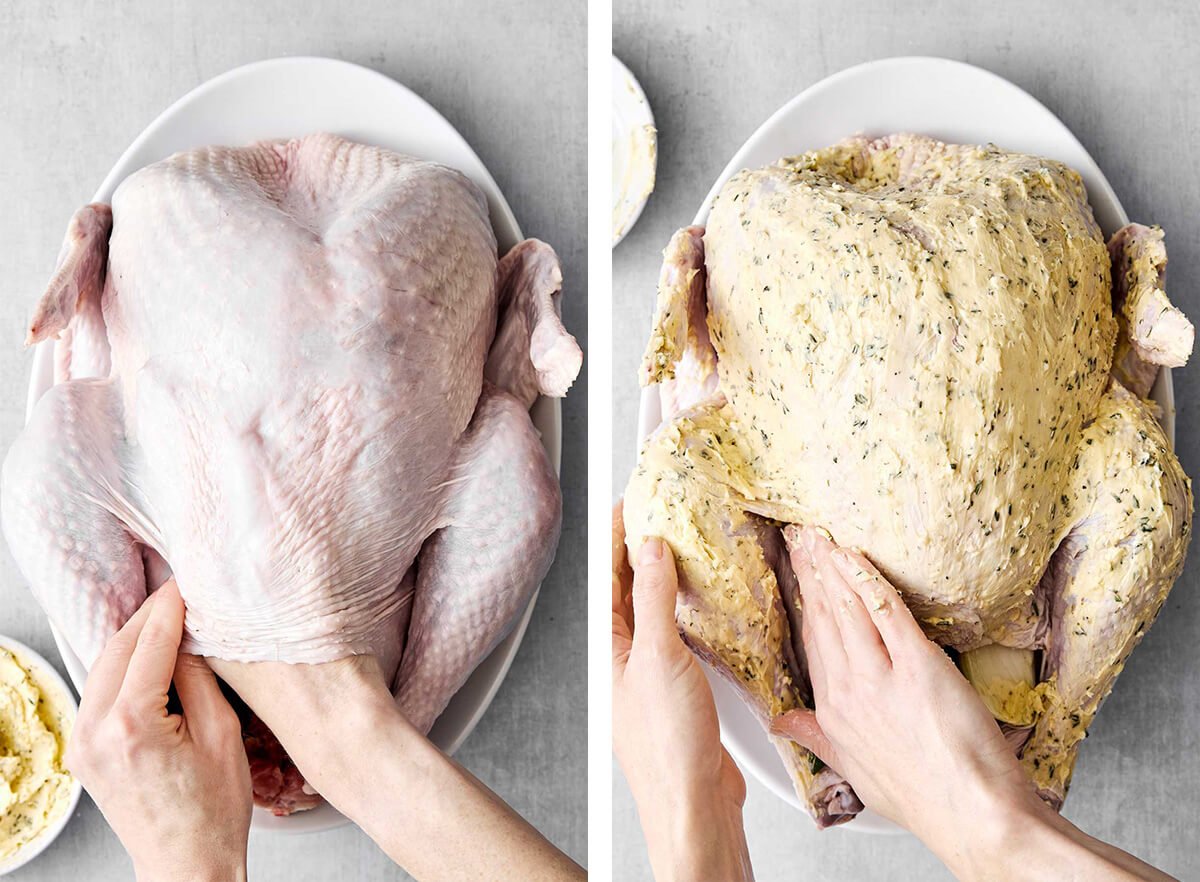
Step four: Spread the herb butter all over. Loosen the skin of the turkey on top of the breasts by gently sliding your fingers underneath. Spread about ⅓ of the compound butter evenly underneath the skin. Spread the remainder of the herb butter all around the outside of the turkey.
Pro tip: Don’t truss the legs! Resist the urge to tie the turkey legs together. Yes, it makes the turkey picture perfect, BUT trussing prevents the air from circulating properly, which can result in unevenly cooked meat.
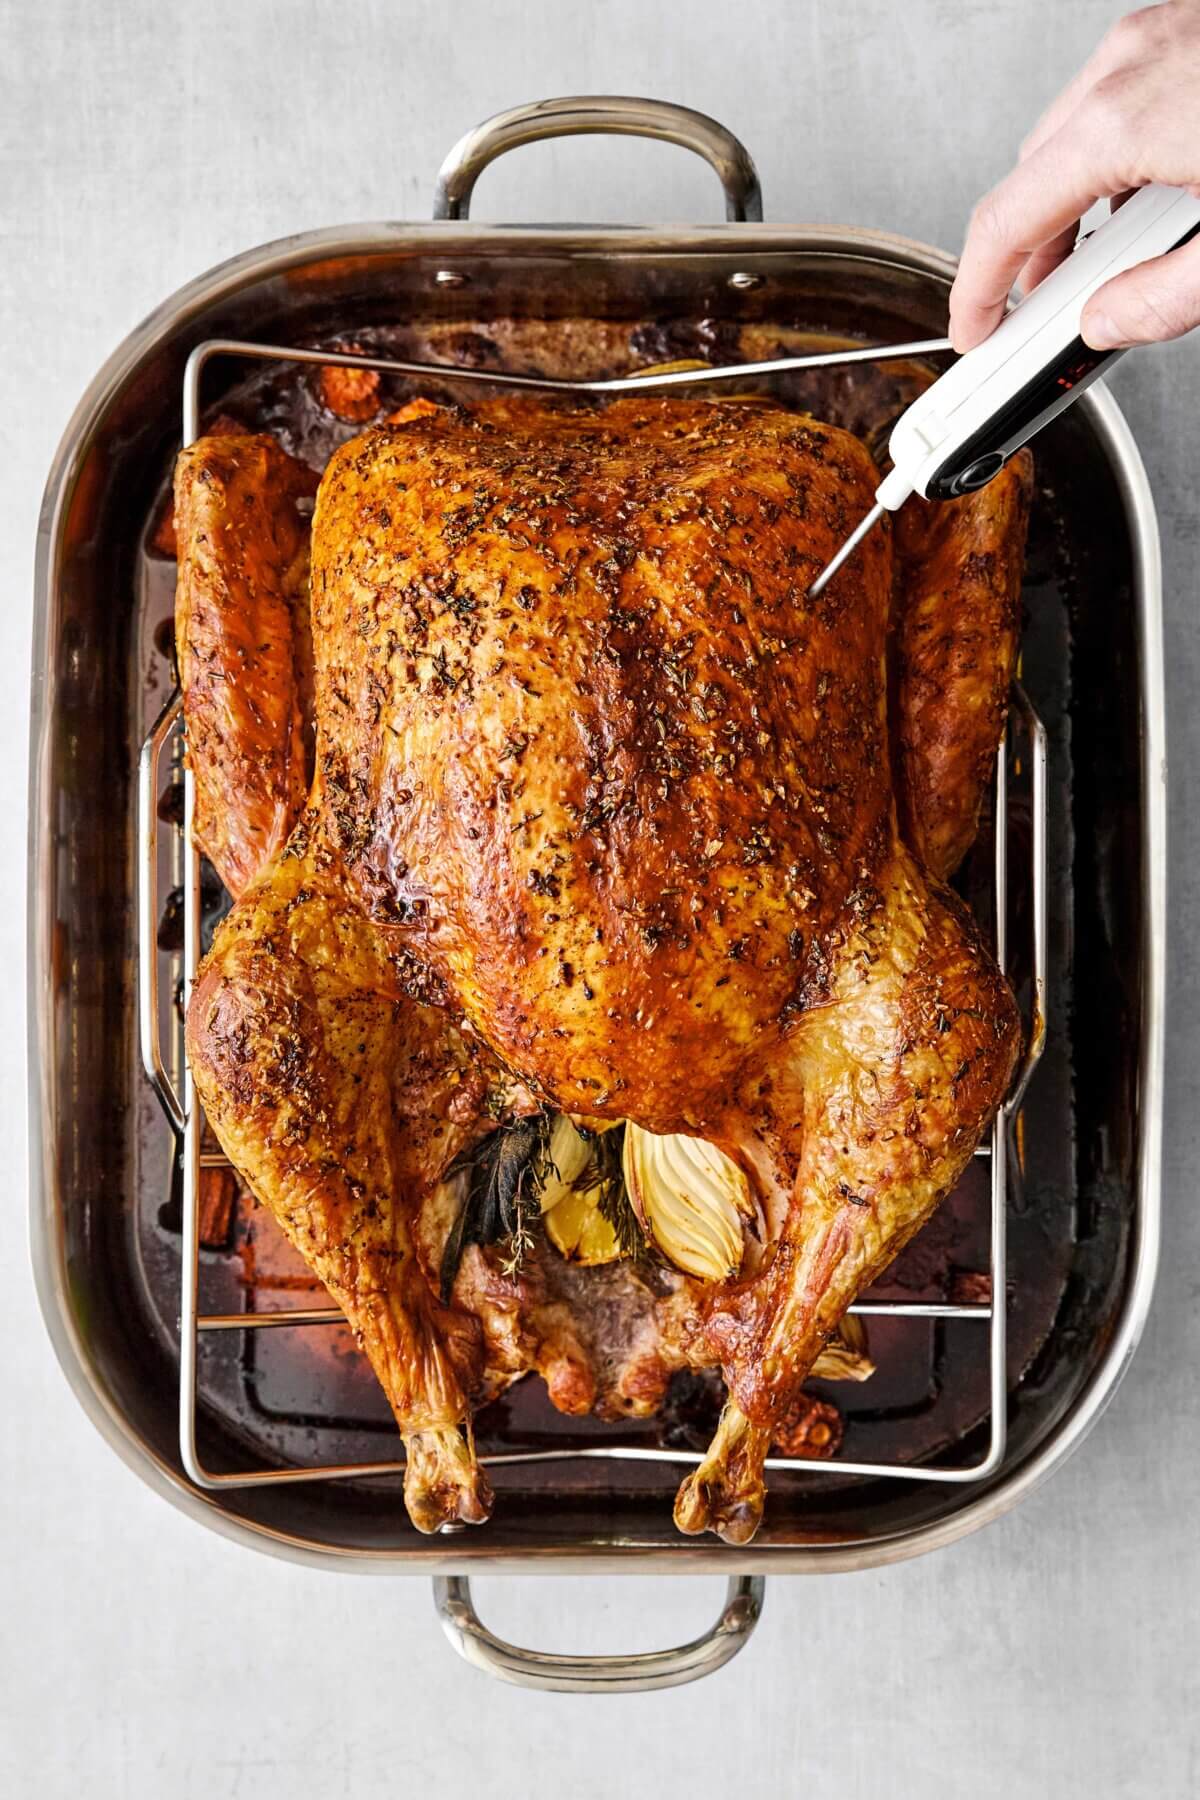
Step five: Cook the turkey. Place the turkey on a roasting rack or on a bed of veggies (or both, which is what I do). Then there’s only one thing left to do—cook the turkey!
How Long to Cook a Turkey
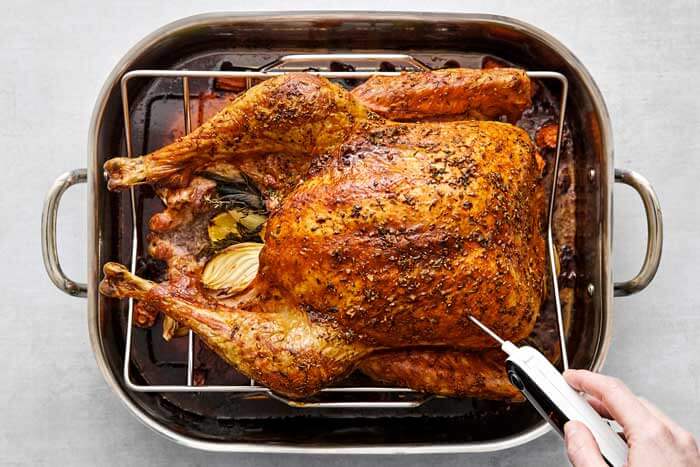
Ready for good news? Because we didn’t stuff the turkey, it will cook about 30 minutes faster. On average, plan for about 15 minutes per pound of turkey. But remember the BEST gauge is the temperature. You want to cook the turkey to 158° to 160°F (measure at the thickest part of the thigh or breast). But here’s a guideline:
- For a 10 to 14 pound turkey: 2 ½ hrs to 3 ½ hrs
- For a 14 to 18 pound turkey: 3 ½ hrs to 4 ½ hrs
- For a 18 to 22 pound turkey: 4 ½ hrs to 5 ½ hrs
Keep an eye on your turkey when it’s about 75% done. Then, check the temperature every 10 minutes. Remember that ovens can cook slightly hotter or cooler. If you notice the skin browning too quickly, you can always place aluminum foil on top.
Always Let Your Turkey Rest
Once you remove the turkey from the oven it’s imperative that you let it rest for at least 30 minutes. This allows the juices to redistribute in the meat, making for a juicer turkey. It’s much better to have a juicy turkey than a sopping wet cutting board!
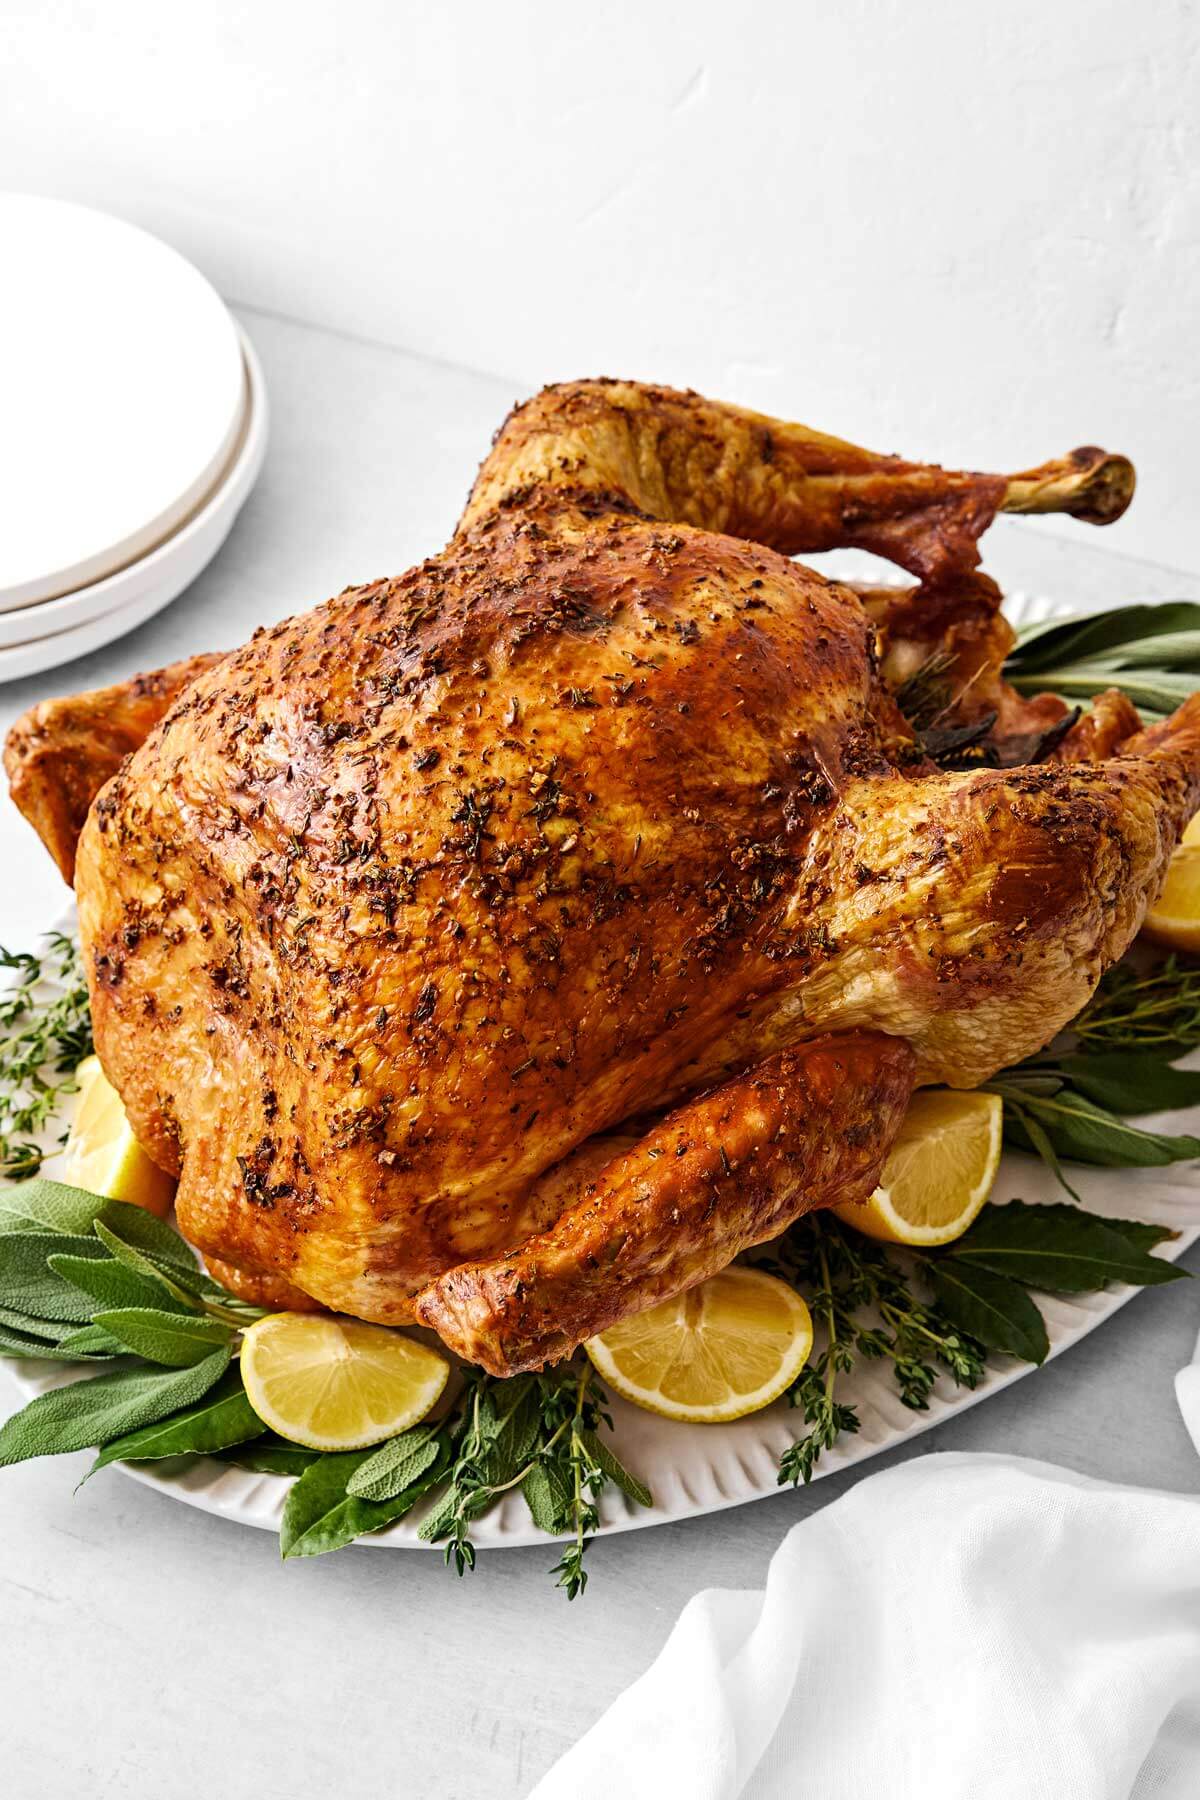
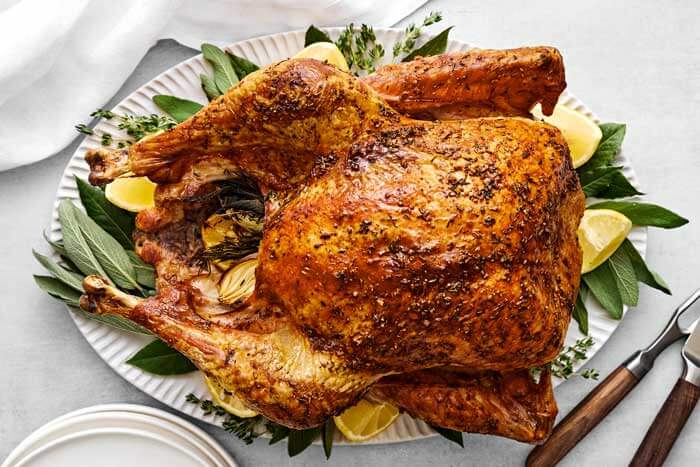
Carve and Serve Your Beautiful Bird
At this point, all that’s left to do is admire your gorgeous, golden turkey, carve it up, make a rich, flavorful gravy, and wow your guests. Follow my tips on how to carve a turkey to present it beautifully on the table. For a complete Thanksgiving spread, serve the turkey with:
- Cranberry Sauce: An essential Thanksgiving sauce!
- Mashed Potatoes, Mashed Sweet Potatoes or Mashed Cauliflower (for a low-carb option): You always need something creamy.
- Sweet Potato Casserole: My favorite holiday casserole.
- Honey Glazed Carrots: They’re beautifully caramelized.
- Creamed Corn: They add a vibrant pop of yellow to the table.
- Balsamic Bacon Brussels Sprouts: This side dish always disappears fast!
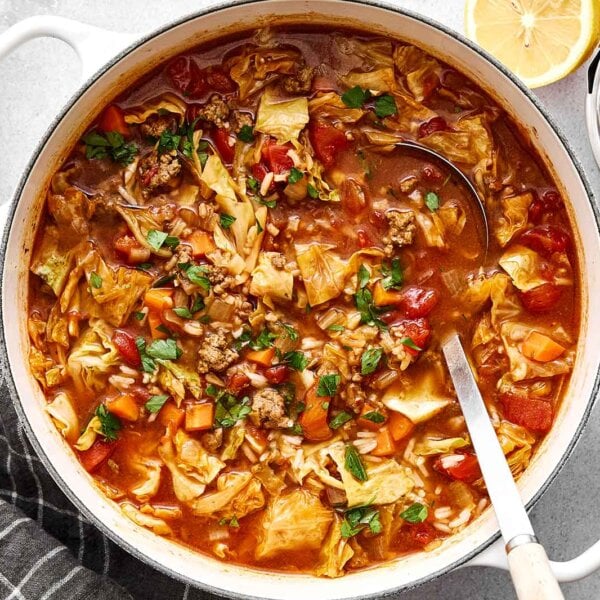
Need help with a timeline on the big day? Check out my Thanksgiving game plan and comprehensive Thanksgiving menu. And if turkey isn’t your jam, I’ve also got a stunning prime rib, beef tenderloin, or honey baked ham you can serve. Lastly, if you have turkey leftovers (which are always the best), transform them into a turkey soup, turkey cobb salad, or turkey casserole!
Common Questions
Your bird may be condensating or your butter may be too cold and firm. Make sure your turkey has come to room temperature for an hour and pat it dry with paper towels to remove moisture. You can also soften the butter for 5 to 10 seconds in the microwave, then it should spread easily.
If you’ve checked the temperature in the thickest part of the breast and thigh and it’s at 165F then it’s cooked through. If it’s not golden enough, you can always turn on your top broiler for just a couple of minutes.
Lower the temperature of your oven and cover it with aluminum foil. Also, I recommend buying an oven thermometer to double check if your oven is cooking too hot.
Make sure your turkey isn’t positioned too high in your oven. If you can, lower your rack. Then, cover just that part with aluminum foil.
It’s normal for there to be some pink on cooked turkey, especially if you have a young bird. As the USDA says, you need to go by temperature, not color. As long as your turkey is cooked to 165°F it’s safe to eat.
If you make this turkey recipe, I’d love to hear how it turned out in the comment box below! Your review (along with over a thousand other reviews on this recipe!!) really helps give confidence to other readers in the community. And if you’re hungry for more healthy food inspiration and exclusive content, join my free newsletter here.
Description
Video
Equipment
- Roasting Rack This is the one I've personally used for years.
- Carving Knife A quality carving knife is key!
- Probe Thermometer An essential tool for cooking the best turkey.
Ingredients
Roast Turkey
- 12 to 18 pound turkey (*see notes below about using a larger turkey), fully thawed
- 1 onion, peeled and quartered
- 1 lemon, quartered
- 1 to 2 sprigs fresh rosemary
- 1 to 2 sprigs fresh thyme
- 1 to 2 sprigs fresh sage
- kosher salt and black pepper
Herb Butter
- ¾ cup unsalted butter, room temperature
- 6 cloves garlic, minced
- 1 teaspoon kosher salt
- ½ teaspoon black pepper
- 1 tablespoon finely chopped fresh rosemary
- 1 tablespoon finely chopped fresh thyme
Vegetables Under Turkey (optional, but recommended)
- 1 onion, peeled and quartered
- 3 celery ribs, roughly chopped
- 2 carrots, roughly chopped
Instructions
- Bring the turkey to room temperature. Allow your turkey to come to room temperature by removing it from the fridge 1 hour before roasting. Then, remove the giblets.
- Fill the cavity. Preheat your oven to 325°F (160°C) and pat the outside of the turkey dry with paper towels. Season the cavity of the turkey with salt and pepper. Then fill it with the onion, lemon, and fresh herbs. If your turkey is smaller, don't overfill the cavity as you do want some airflow.
- Make the herb butter mixture. In a small bowl, make the herb butter by stirring the softened butter, garlic, salt, pepper, rosemary and thyme together.

- Rub the herb butter all over. Loosen the skin of the turkey gently by sliding your fingers underneath. Then rub about ⅓ of the herb butter between the skin and turkey breasts. Rub the remaining herb butter all over the entire outside of the turkey.

- Place on a roasting rack. Place the turkey on a roasting rack or on top of a bed of chopped vegetables (if you don't have a rack), or both! Tuck the wing tips under the turkey to prevent them from burning.
- Cook the turkey. Place the turkey in the oven and roast for about 15 minutes per pound, or until the internal temperature reaches 158°-160°F. You don't need to baste the turkey, but do keep an eye on it after it's about 75% done. If you notice the skin browning too quickly, you can place aluminum foil on top. To verify the temperature, place a thermometer into the meatiest part of the thigh or breast. The turkey will continue to cook once it's removed from the oven and will rise in temperature to 165°F, after it's rested.
- Let it rest. Let the turkey to rest for 30 minutes before carving. This allows the juices to redistribute, making for a deliciously juicy turkey. To keep the turkey warm, you can cover the turkey with aluminum foil on the counter.
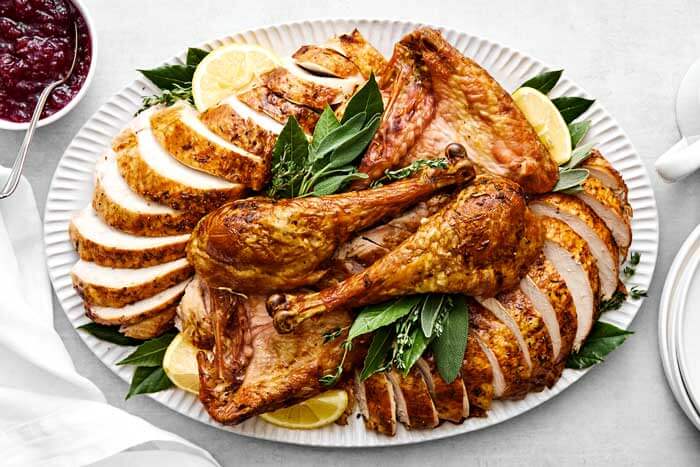
- Carve and serve. The last step is to carve the turkey and serve it up on a platter. Make sure to follow my tips on how to carve a turkey. And don't forget to save the juices from the pan to make turkey gravy!
Lisa’s Tips
- You can certainly use a turkey larger than 18 pounds, but you may need a little more herb butter and you’ll need to cook it longer. If your turkey is less than 12 pounds, you may have a little extra herb butter, so you might want to reduce the quantity.
- It’s common for ovens to vary by up to 25 degrees, with some cooking hotter and others cooking cooler (my oven cooks cooler). So it’s best to verify how your oven cooks (before the big turkey day), by purchasing an oven thermometer and testing.
Nutrition
©Downshiftology. Content and photographs are copyright protected. Sharing of this recipe is both encouraged and appreciated. Copying and/or pasting full recipes to any social media is strictly prohibited.
This recipe was originally posted November 2020, but updated to include new photos and information for your benefit!
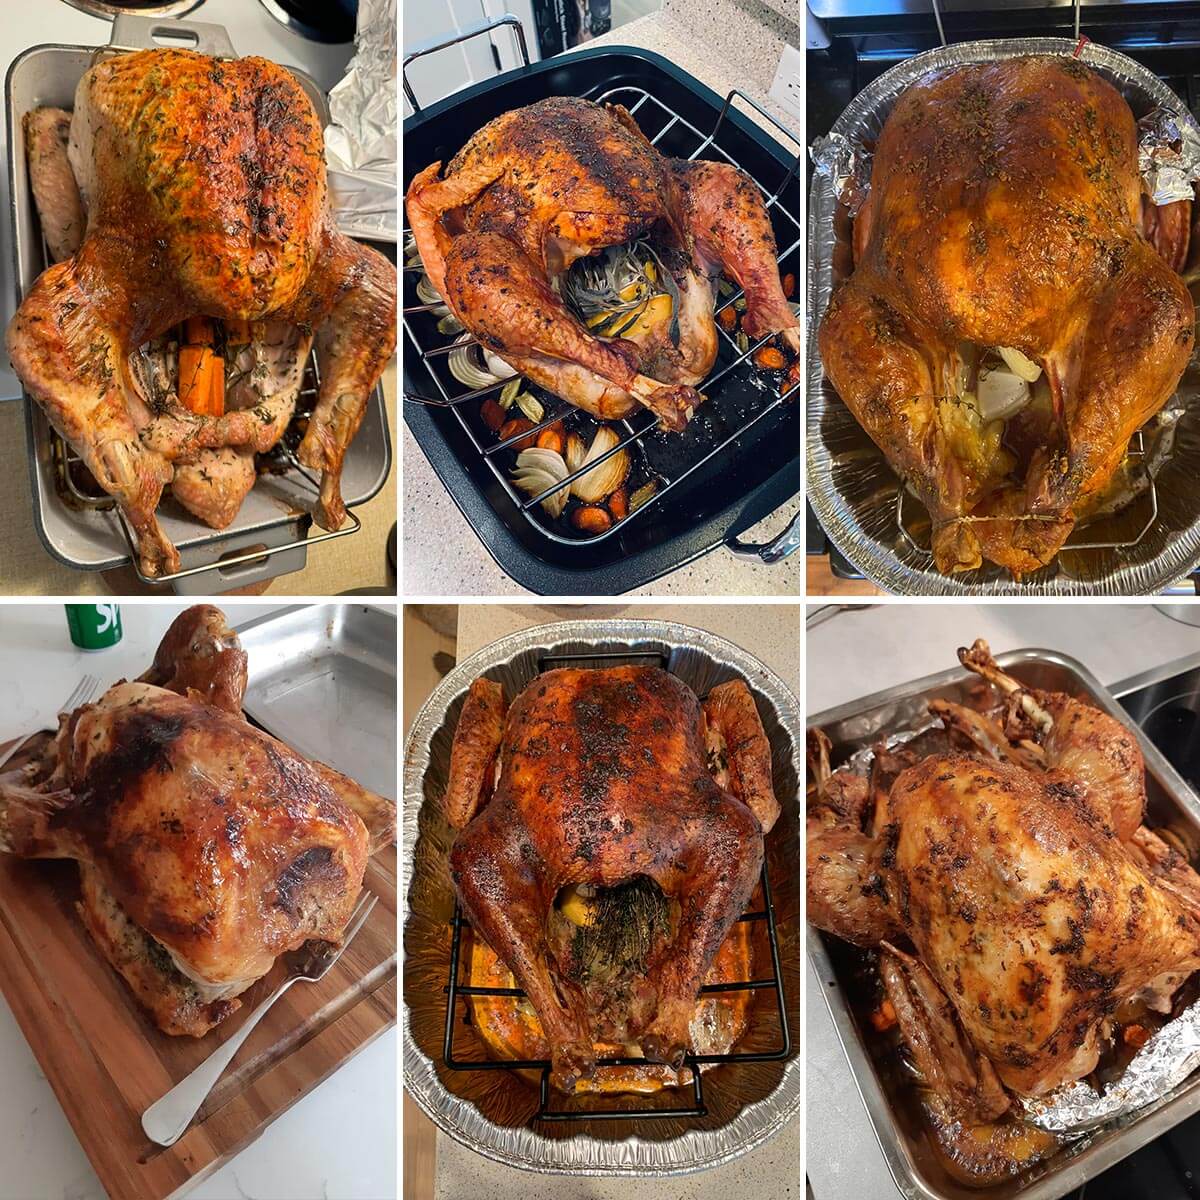
Behind The Scenes
Normally, I show raw and candid photos from my kitchen in this “behind the scenes” section (often taken as I’m testing the recipe). But because this turkey recipe is sooo intimidating for newbies, I instead wanted to highlight YOUR gorgeous photos of turkey success!
Over the years, I’ve received hundreds of photos across social media (thanks for always tagging me!) with exclamations of happiness when your bird turns out beautifully golden and worthy of that Thanksgiving centerpiece spot. I wish I could feature them all here, but hopefully this handful of reader photos will convince you of just how foolproof this recipe really is!
Perfect. Got done a little sooner than expected. Maybe because it was brought to room temperature first. Watch your timing. Even though it registered at 180 degrees, it was the most moist turkey I’ve had in years! Easy too! Thanks!
Definitely keep an eye on timing and always use an instant read thermometer! Glad it turned out great, Em!
I have never cooked a whole chicken, let alone an entire 20lb Thanksgiving centerpiece. However, I followed this recipe to a T and ended up with perfectly moist and delicious dinner. The tip to check the temp at 75% done was clutch—my bird was magically at temp an hour earlier than expected! Thankfully pulled it out to rest and kept it from getting dry. Great recipe, thank you!
That’s amazing to hear, Kaitlyn! I’m so glad your turkey turned out perfectly for Thanksgiving dinner. Now you’re a turkey pro!
This was delicious and easy to make. Being a newbie at turkey and I was happy it wasn’t too complicated. Thanks Lisa for the great recipes. I made your entire menu. We celebrated today due to family schedules.
I sent a pic on a different email.
Wonderful! Glad this recipe was easy to follow along to, Kim.
Best Thanksgiving Turkey recipe prep/method on the internet hands down! I’ve been using this recipe and method of prep for quite a few years and it always turns out Supreme. Beautifully browned, moist-tender meat, so flavorful and the best darn pan drippings for an excellent tasting gravy. This recipe deserves an 🥇 in many categories because it’s by far the BEST. Thank you, Lisa for continually sharing it.
Thanks for leaving a review, Madeline! I’m so glad this turkey recipe was such a hit for Thanksgiving!
Juiciest turkey ever!! Thank you so much for the recipe.
Of course, Rachel! I’m so glad this was a hit.
Made this turkey recipe for Thanksgiving 2025! So easy, elegant, delicious! It came out looking beautiful and tasting like a dream. Memories in the making. Thank you Lisa for this beautiful recipe! I paired it with your Cranberry sauce recipe which I have loved and used for years. A big hit in our family! ❤️🍁🦃
So happy you enjoyed this turkey for your Thanksgiving this year, Jennifer! Memories in the making is such a great way of putting it. Happy Thanksgiving!
I was so nervous making the turkey but it came out delicious! It was tender and juicy. The best part was that my family loved it! I’ve tried several of your recipes and none have disappointed, thank you!!
Glad the whole family loved this turkey recipe, Elizabeth!
Thank you!!!!
Your video & wonderful recipe took the stress out of making a turkey. Additionally it turned out beautifully!
Glad the video was helpful during the process, Michelle!
Amazing ! 2nd year I used this recipe.
Do you have suggestions to use my leftover fresh thyme, rosemary and sage? Would be great to use in other recipes before they go bad.
Hi Monique – So happy you loved this turkey recipe! And for leftover herbs, it’s always super easy to make a compound butter. I have a separate recipe for that on my website!
This recipe was very good and pretty simple. Definitely a win in my book
Glad your turkey turned out perfectly, Kelsey!
This is by far the best recipe I have made, this was my second year with this turkey recipe and again every one was more than happy with the way it turned out. Just followed the recipe and again no fail 😀.THANKS
Wonderful, I’m so glad you enjoyed it, Steven! Thanks for coming back to make it for your second year. Happy Thanksgiving!
I made your turkey recipe and it turned out beautiful, I had my family all over to my new house. I just moved to and everybody kept commenting was the best turkey they ever had. I started with a sprouts organic free range young turkey about 10 pounds and followed everything exactly as you said, then I watched your how to slice the turkey video and did it that way and it turned out great. Thanks again
How exciting! Congrats on the new house and for cooking the best turkey yet, Michael!
Wow, this easy roast turkey recipe was excellent! The herbed butter coating made a juicy bird and the result was a picture perfect, The bits of herbs remained on the skin after the butter melted and it browned beautifully. Hard to resist basting but only did it a few times so, again easy! i have followed you for a long time and somehow missed this recipe! Thanks for all your recipes and the was they are presented on your site.
You’re more than welcome, Barbara! I’m so happy you loved my turkey recipe. Happy Thanksgiving!
This turkey recipe was the best. Everyone raved about how juicy and flavorful it was. I checked the internal temp on the turkey at 75% as you suggested and it was done. No more dry turkey going forward. Definitely a keeper.
Wonderful! So happy to hear you had a deliciously juicy turkey. Thanks for your review, Marina!
Best turkey I’ve made yet! Thank you!
You’re very welcome, Sarah!
This is the second time we have used this recipe for our thanksgiving turkey. It turned out just as great and all our guests enjoyed the wonderful taste and flavor.
Wonderful! Glad this turkey recipe was a hit the second time around as well, Alesia!
As like all the other Downshifties…we were unable to snap a picture of the precut bird due to the excitement on how awesome it truly looked! As things happen, i cooked our 15lb bird for 4 hours at 325 and when i put our thermometer in, it was at 180 degrees. I took it out and let it rest for 30min, and it was still moist and tender (thankfully!!). It was my best Thanksgiving Turkey I’ve ever make, thank you Lisa!!!
Yes, on a busy day in the kitchen it can be hard to remember to snap a photo of your gorgeous turkey, haha! But so happy you loved the recipe and ended up with a moist and tender turkey. Happy Thanksgiving, Lori!
This was THE BEST AND EASIEST Thanksgiving Turkey I have ever made! Super easy. I made the herb butter the day before and stored that in the fridge. Once I prepared the turkey EXACTLY as Lisa showed in her video, I popped it in the oven and LITERALLY forgot about it! No basting (no need to!). We let it stand for 30 minutes (never did THAT before) and sliced it (watch her video on how to slice a turkey also!). I am tossing out ALL my “How to make a turkey” recipes and saving this one!
Yay, I’m so thrilled you loved this turkey recipe, Connie! And so smart of you to make the herb butter the day before. I do that as well to save time in the kitchen on Thanksgiving. :)
I have tried cooking turkeys in past years and they always turned out wonky. But I followed your recipe this year and it turned out GREAT!! The flavors were spot on, the only thing I didnt use were one of the herbs because our stores were sold out. Very easy, simple, and yet great flavors! I forgot to take a picture, but I will definitely be using this recipe next year!!! Thank you thank you!!!
Hi Savannah – Thrilled to hear your turkey recipe turned out great!!
I’m 73. This was the best turkey I ever made. Bar none.
Yay, love to hear that! Thanks, Margaret. And Happy Thanksgiving to you!
Best turkey recipe! So delicious & easy to make!
Thank you Lisa! 🦃❤️😋
You’re so very welcome, Debbie! I’m happy you loved it!
We made this for a Friendsgiving and everyone loved it so much that we made again it for the family Thanksgiving a week later where it was a huge hit again! So easy and comes out absolutely perfect – will be making this again and again!
So happy this turkey recipe was a hit with your friends. Thanks, Blake!
I made this turkey recipe for the second year in a row and it was delicious! It also smells so good just a few mins after it goes in the oven. I will definitely make sure the butter is softer next time so it will spread a little easier (I prepped it the day before and didn’t leave it out long enough). I also followed your mashed potato, cranberry sauce, and gravy recipes – all perfect! Thank you for all of your wonderful recipes for Thanksgiving, and all through the year!
Sounds like a delicious Downshiftology spread! Glad your turkey turned out perfectly again this year, Michelle!
I have made this for three years now. It’s the only way I make turkey and it’s always a hit. I actually didn’t really think I liked turkey very much until I tried this. My cousins walked in this year and asked if I was making the turkey the same thank you for all the helpful hints along with the recipe Lisa and hope you had a wonderful Thanksgiving!!
Amazing! Happy to hear this turkey has become a tradition in your household now, Courtney!
I made the turkey recipe yesterday and it was crispy on the outside and juicy o the inside. I had a little trouble with the butter not sticking to the turkey but then found the answer to that and all was well. I did not take a picture, I should have. Thank you.
Sounds like a perfectly cooked turkey! Glad it turned out great, Kathy.
I followed Lisa’s recipe exactly and my 12 pound turkey turned out absolutely fantastic. At the end of three hours cook time my turkey looked exactly as pictured above. In fact, it was probably done in two hours and 45 minutes but, I was too busy, preparing other dishes that I failed to check it. Nonetheless, it was still juicy and a big hit with my dinner guests. I will use this recipe from now on.
Sounds like you had a seamless cooking experience with this recipe, Jerome! Happy to hear that.
This recipe was so easy to follow and turned out absolutely delicious! The photos are super helpful. This was our first year doing turkey instead of ham, and our whole family has been converted. The turkey was beyond juicy! We can’t wait to make this again next year as a new family tradition.
Woohoo! Welcome to the turkey side! Glad the whole family loved this recipe, Emily.
This recipe made the most delicious, moist and flavorful turkey! I prepped it the night before and it made my Thanksgiving morning so much easier. I also made Lisa’s recipe for sweet potatoes and her cranberry sauce! They were favorites at the table. Next year I’ll add her Thanksgiving Peas to our menu. Thanks Lisa for these delicious recipes!
Hi Suzanne – that makes me so happy to hear you enjoyed several of my recipes for Thanksgiving, including this turkey and my cranberry sauce. Can’t wait to hear what you think of the Thanksgiving peas next year, though no need to wait. I say make it for an easy weeknight side dish! ;)
I have tried three times this recipe already and we just love it. Easy to follow and to prep ahead. The gravy recipe is easy and delicious also. Plus the carving technique was helpful also:)
Glad this turkey is a hit every time, Zina!
This recipe made the most delicious, moist and flavorful turkey! I prepped it the night before and it made my Thanksgiving morning so much easier. I also made Lisa’s recipe for sweet potatoes and her cranberry sauce! They were favorites at the table. Next year I’ll add her Thanksgiving Peas to our menu. Thanks Lisa for these delicious recipes!
Glad you got to enjoy so many Downshiftology recipes for Thanksgiving, including this turkey, Suzanne!
We tried this recipe for the first time to do something different and the turkey was so flavorful and tender, we will definitely be using it again! The recipe is super easy to follow and made such a pretty picture but it was the flavor and tenderness and won me over.
Amazing to hear your turkey turned out perfectly in terms of taste and texture, Ariana!
This is the first time I made a turkey because my husband usually hogs the kitchen. I followed the recipe exactly and it turned out great! My dad is a turkey taster aficionado and he loved the turkey! It was moist and flavorful and the gravy was excellent too.
We will use this recipe from now on👍
Glad your first ever turkey was a success, Amy! Sounds like a win with that special comment from your dad.
Lisa thank you for this and the video, you made it easy and possible for me to make a good turkey (emailed pic).
Glad this recipe was easy to follow along to, Aida!
First time roasting a turkey and let me tell you, it turned out amazing! Juicy and so full of flavor thanks to the aromatic butter. An absolute keeper – thank you, Lisa!
Yay, I’m so happy your turkey turned out amazing. Thanks, Cat!
my turkey came out beautifully. Thank you for this recipe.
Happy to hear your turkey turned out perfectly, Kristina!
I made Lisa’s recipe for Roast Turkey today. It turned out great. The meat was delicious and the breast and leg skins were nice and crispy. Her time estimates were spot on. I also followed her suggestions for presentation and my carved meat plate was the prettiest I’ve ever made. Thank you so much for your guidance to a very successful Thanksgiving meal!
Wonderful! I’m so glad your turkey turned out perfectly for the big day, Kent.
Delicious and juicy! Was a Thanksgiving hit, thank you for the recipe. Our 4 year old helped apply the herb butter to the bird which was a fun learning opportunity and we made some great foundational memories.
Aw, love how the little one was able to be a part of the cooking process, Samantha!
Absolutely delicious, the herb butter was a game changer. This recipe is a keeper.
Thrilled you loved this Thanksgiving turkey recipe, Sarah!
I cooked a turkey for the first time in my life for Thanksgiving using this recipe. I do not normally like turkey but this one was delicious. Thank you so much for helping us celebrate the holiday!
Yay! Haopy to hear your first ever turkey was a success, Bill!
OMG!! The best Turkey I have ever made and the first time not using a bag or stuffing it! The seasoning was amazing!!!!!! Followed the recipe step by step and baked this 16 lb., to perfection in 2.5 hours (organic turkeys bake faster due to know preservatives) and it was crispy on the outside and juicy on the inside. This will be our family recipe for many years to follow.
Hi Donna – Makes me so happy to hear this recipe will now be a tradition for the holidays. Enjoy!
So delicious!!! The recipe was very easy to follow, I loved step by step instructions and also helpful tips, like buttering the turkey a day before. This will definitely be THE turkey recipe from now on.
Glad the instructions were easy to follow, and that this will be the turkey recipe you use from now on. Enjoy, Lena!
The other reviews are right about how good this turkey recipe is. I am the actual worst at cooking and my family was raving about how good and juicy the turkey is.
Now you’re a pro cook! Glad this turkey recipe was a hit, Brianna.
Used this recipe today and it turned out awesome!
Wonderful, I’m so thrilled to hear that. Thanks, LeeAnn! Happy Thanksgiving!
Best recipe. Butter under the skin is a must and letting the turkey rest. Was a big hit with everyone. Will definitely make this again next year.
Absolutely! Butter under the skin makes it extra moist :)
I’m making this tomorrow, my question is do I need to add any salt to the butter if i’m using salted butter? Thanks
Hi Emilia – no, you would not need to add any extra salt.
I made this turkey recipe as a part of our gluten free Thanksgiving meal. It was easy to prep and follow the directions. The aroma of the garlic and herbs coming from the oven was fantastic. My enrire family loved it and we will definitely be making this again! Thanks Lisa.
Glad the whole family enjoyed this turkey recipe, Chelsea!
First Thanksgiving without Mom’s Turkey so we tried this. It was AMAZING! So easy and such great flavors! My brother and dad who aren’t big Turkey fans loved it! This will be a new tradition for years to come! Thank you for sharing!!
Woohoo! Happy to hear this will become a new tradition, Palmer.
Turkey was scrumptious and perfectly spiced to hit all taste buds just right only thing I did as an address on to ur recipe was add a handful of whole jalapeños into the turkey before cooking and boy I’ll tell you what it came to be the best turkey I’ve ever made next year I think im going to add a can of rotel just for S’s&G’s but yes thank you for your easy to make ready recipe for beginners it was perfect have a blessed thanksgiving day and many more to come.
Jalapenos sounds like a wonderfully spiced addition, Eddie!
This is the third year making this and have past to friends and family to make. Easy and so delicious. Thank you for sharing this recipe.
You’re more than welcome, Debbie! I’m so glad you love the recipe, and thank you for sharing it with your family and friends. That always means so much!
I’ve made this twice before and had a delicious result using a fresh Wegmans turkey. This time I used a fresh Butterball turkey and could not get the butter to stick to the skin to save my life. I’m not sure if I accidently used to much of the herbs or if the skin was just too smooth, and before you ask, yes, the skin was completely dry. Any ideas will be great, fingers crossed that it comes out well since I had to just leave the herb butter in clumps and added extra because of it.
Hi Spring – I’m so glad you enjoyed this turkey! To make the butter a little easier to spread, you can microwave it for 5 seconds. It spreads easier when it’s just a smidge softer. Hope that helps!